So here’s the deal: I’m excited about today’s post.
I know I say that about every post, and it is the honest truth – if I’m not excited about a project or post, I don’t want to share it – but it is especially true for this post today. Extra-excited.
I’ve been in a slump for a while.
Slump is such a mild way to put it. Quite honestly, I have been anxious and depressed. Astute readers might have gathered as much from paragraphs here or there. It was a rough summer, and the end of summer didn’t bring the peace and rejuvenation I had hoped. For weeks I kept up with this blog by way of Thrift Score Thursday and not much else. I felt like every ounce of creativity had been sucked out of me like those last droplets of juice-flavored air from a child’s Capri Sun. There was no inspiration or motivation left. I didn’t even want to create. But I wanted to want to create. Frustrating. Soul-numbing.
As we headed out the door on a long car ride several weeks ago, I grabbed a small stack of favorite old Elle Décor issues to pass the time. A small part of me was hopeful that what had once been such a source of enjoyment and inspiration could perhaps spark some creativity again.
And there it was on the page of an issue from March 2012 – a blue and gold agate slice sconce (designed by Marjorie Skouras), priced at $1650. Each.
If there is anything that gets me excited about DIY, it is lighting. I can’t explain why, but I have a complete fascination with creating my own light fixtures (like this tripod lamp, this industrial pipe light fixture in my kitchen, these Ikea hack wall sconces, and my copper pipe icosahedron pendant light).
And I instantly found myself planning (and, okay, obsessing over) my first DIY project in months, convinced that I could make my own DIY agate sconces and motivated to figure out how to do so.
Spoiler alert: it happened.


And for a whole lot less than $3300 for the pair. Thousands less. (Isn’t it nice when you can say that about a project?)
Now, I will be honest and say that this was no entry-level DIY.
It’s definitely not quick or easy or extremely cheap (but hey – I saved thousands), and I called in the big guns on this one – my dad and his arsenal of power tools.
I also can’t one-hundred-percent-honestly call this a “tutorial”, since we definitely flew by the seat of our pants (and boy did those pants get a crash course in aviation!) and some things were completely dependent on the measurement of the particular agate slices I used.
That being said, I did document the process extremely well so if you have a little ambition, imagination and access to certain power tools or power-tool-possessing friends, you can hopefully benefit from our experience!
*Today’s post may contain affiliate links. If you make a purchase through an affiliate link, I may receive a small commission. You can read my full disclosure here. I hope you all know by now that I do only share things I really truly love!
Supplies:
- 2 coordinating agate slices, roughly 6” diameter– I purchased mine from this eBay seller (I believe the eBay store for Crystal River Gems) and paid pennies more than I would have from Crystal River Gems directly, plus I was able to choose each slice via photo rather than selecting a size and color family and hoping for the best. My slices are not matched (cut from the same piece) but they are the same color and roughly the same dimensions. I think the variation is kind of fun. (And I’m impatient. And it was really hard to find large matching slices.) My cost: $54.
- 2 wooden plaques, 6.75” diameter
- 10’ roll of 1/4” copper refrigeration coil
- 2 candelabra-base socket 6’ cord sets
- Paintable cord channel
- Copper leaf
- Metal leaf adhesive
- Liquid leafing finish – I used the Precious Metals leafing finish in bronze, which I have found to be a better match for copper piping than the Precious Metals copper version.
- Minwax Polycrylic in gloss
- Krylon Copper Premium Foil Metallic spray paint
- Small sawtooth picture hangers – I already had a few on hand, but you’ll find these in the picture hanging aisle of your local hardware store.
- 1/2” self-adhesive vinyl bumpers – Also available in your home improvement store with the furniture accessories like felt pads, casters, etc.
My Total was $94 ($47/sconce) since I already had many supplies on hand. I’d estimate that the total with no supplies on hand would be around $120, $60/sconce.
Let’s remember that the inspiration sconces were $1650 each. And celebrate for just a moment…
Before we diving right into the nitty-gritty manufacturing details!
ARE YOU READY?!
Step 1: Drill a hole for the light socket.
We drilled a hole into the center of each wooden plaque using a 1” spade bit. (And by we, I mean my dad, in most of the power-tool usage instances. Thanks to my awesome dad for not only being my hand model, but also doing most of the scary stuff on the project. Like using spade bits, and routers, and scroll saws. And for being awesome enough to own all of those things.)
Tip: For a smooth hole on each side of the plaque, drill halfway through on one side, then finish making the hole from the other side.

Step 2: Create a channel for the cord.
Using a router with a straight 1/4” bit, we created a shallow channel for the light fixture’s cord on the backside of the wooden plaque. This way, the cord wouldn’t be a layer between the light fixture and the wall – it would be recessed into the wooden plaque.
You can see how we clamped the wooden plaque in place, then used an extra board to create a guide for the router. We set the router-bit to make a very shallow cut from the center hole to the outer edge of the plaque.


Our angle wasn’t 100% perfect, but close enough.

Step 3. Create the copper arm pieces.
This part of the planning process was making me the most crazy.
What would be the perfect material to create the arms that would hold the agate slice? It needed to be strong enough to hold the slice a few inches away from the face of the wooden plaque, but able to create/form/hold some kind of clip so the slice wouldn’t shift forwards or backwards.
So I shot a few drawings and ideas over to my dad to see if he thought the light fixture was DIY-able, and he sent me back this helpful sketch with the idea to use 1/4” flexible copper tubing for the light fixture’s arms, cut at an angle, and then flattened with a hammer so we could bend each arm to hold the agate slices.

Um, brilliant. His plan turned out to be spot-on and worked perfectly!

So here are the copper arms we cut for each light fixture:

And here’s where it gets very specific to each individual sconce – the measurement of the long top arm and the short bottom arm were very dependent on the dimensions of the agate slice for each sconce. Each slice was slightly different in width, which translated to the curve of each top arm being slightly different, but basically we factored in the light socket’s height + a small candelabra bulb, held the agate slice a slight distance above that, and calculated the arm-length based on that.
Relevant finished shot:

We cut the piece for each sconces the same and we cut the end detail around 1” long which allowed for some room for adjustment when the time came for assembly.
We used a pipe cutter to cut each piece to length, and then we (my dad) ended up using his scroll saw with a metal blade to very carefully cut each end detail.

He used a pair of pliers to bend each end into the perfect clip shape to hold each agate slice. (Again, the thicknesses of our slices varied, so this was perfectly customized for each slice.)

Are you still with me? Once more for reference:

Step 4: Attach copper arm pieces.
We used a cylindrical shaped part to created indentations in the middle of each top arm.

Then, we used a center punch to further delineate where we would drill to place screws.

Next, we drilled holes for the screws, before attaching to the wooden plaque.

And here we go, the finished light fixture skeleton! At this point, I packed up all my materials and headed back home (no more heavy-duty tools needed).

Step 5: MORE COPPER.

I decided to use copper leaf on the wooden plaque, and liquid metal leaf (in bronze, which was the perfect match for copper) on my screws, and spray paint the head of my light socket copper so that everything would be cohesive. I sealed the copper leaf and copper tubing with polycrylic in gloss to protect against oxidation.


Tip: stuff something inside your sockets to protect the electrical contacts from spray paint.
Another tip: spray paint on the cord just gets tacky and doesn’t dry well, so you might consider taping it off.

Step 6: Add the cord kit
The socket clips neatly into the hole in the center of the light fixture and the cord runs down the routed channel to the bottom.

Step 7: Final touches
I added a sawtooth hanger and some rubber bumpers to the back of each plaque to ensure that the plaque would sit levelly against the walls.

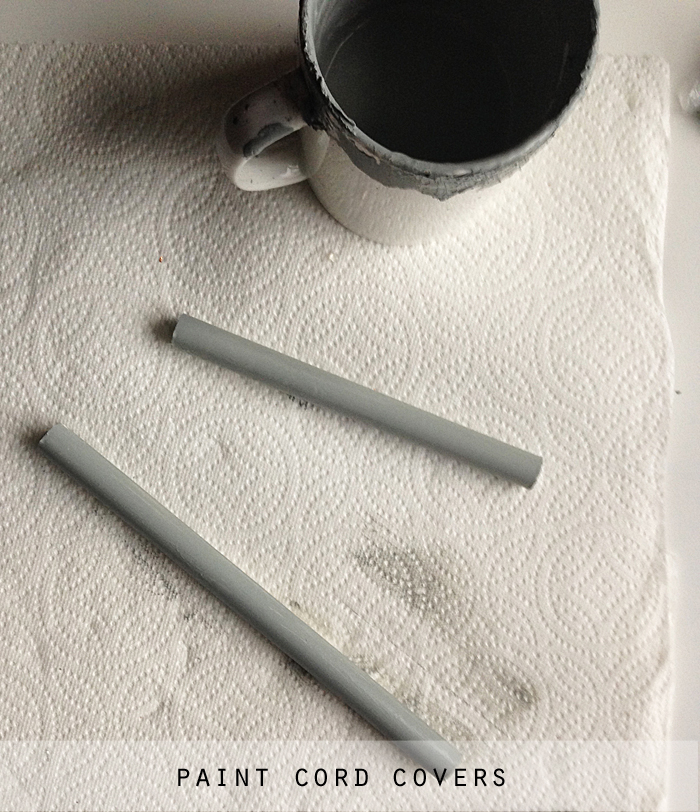
I cut my plastic cord cover to the correct lengths – one length down to reach the cord switch, then another to continue down the wall behind my TV sideboard – and painted it with some leftover wall paint. (That I keep in a plastic-wrap-covered mug. Like everyone does.)
Step 8 – Hang those babies on the wall!
I cut a scrap template to decide where I wanted to hang the sconces and used lots of math to make sure each one would be at the same height and the same distance in from each side of the TV sideboard. (AFTER making 100% sure, to the joy and delight of my husband Bryan, that the sideboard was perfectly centered on the wall.)

I used a stud-finder, but alas no studs were to be found (with the exclusion of the afore-mentioned Bryan), so I used a drywall anchor to hold my screws.
Then, I slipped the sawtooth hanger over the screw and banged on the walls, slammed the door, and asked Bryan to stomp on the floor in the room above to make sure the sconces weren’t going anywhere. Once satisfied, I slipped on my adhesive-backed cord covers and attached them to the wall.
Finally, I slid each agate slice into the copper arms, and my sconces were complete!


I warn you: I have oodles of photos and absolutely zero restraint in the matter. I can’t help myself. They look like candy!


It’s very hard to capture how gorgeous they are with the lights on, but the agate slices backlight beautifully and the 10-watt bulbs I used provide a very soft glow without being glaring – we can have the sconces on and watch TV without a problem.


And finally, do you know what would make me almost as happy as if my wall sconces were actually candy and I could actually eat them (well, have my sconces and eat them too)?
If you pinned or otherwise shared this project with reckless abandon!

All my love!

I cannot get over how pretty these are! And I love the color against those gray walls. and with the copper. Reckless pinning begins now!
Thank you Gretchen! I'm a tad obsessed as well! Your reckless pinning will be met with my reckless eternal friendship!
I'm with Gretchen! They are so so so good! I want them and they would look awesome above my fireplace 😉
Oh Julia – they would! One other cool thing about this design is that I can switch out the agate slices in the future if I ever want to try a different color or find a pair I love more…
Wow, blown away. Those are just gorgeous. And, I'm totally glad you are out of your slump… I missed your awesome projects! =)
Thank you Ashley! I am so glad to be back creating again as well – it always makes me feel better to make something with my own two hands!
They're beautiful, Brynne! Great job!
Sarah
Thank you so much Sarah!
SWOON! These look fab
Thank you Eve! 🙂
Stunning! I'm currently obsessed with all things agate so I guess I'm not shock by how much I love these!
Me too! My dad is a geologist, so I grew up with fun rocks (geodes, etc.) around the house – so I'm loving that this trend is bringing me back to my childhood 🙂
I bow to you. Bravo. Simply gorgeous! You better believe I pinned the bejeezus out of them!
Thank you Trisha! Smooches!
you are a genius. that's all. LOOOOOOVE these soooooo much!
Thank you Cassie!!! You are so sweet!
They're gorgeous Brynne! I'm so happy you were able to figure out how to make them 🙂
Thank you Caitlin! I'm so thankful my dad collaborated on the design and helped me figured it out!
Beautiful tutorial. These are so great, unobtrusive yet eye drawing. Great idea!
Thank you so much Karisa!
OMG, Brynne, would you beleive me if i told you i guessed you were making lamps out of them when you foreshadowed this a few weeks/a week (i have no grasp of time)?! I was thinking of all the ways i could picture it happening but these are STUNNING. You rock, my friend!
Whoa – amazing guess girl! Are you psychic?! 🙂
Those sconces are so amazing Brynne. WOW! You are on a total roll lately with all your amazing DIYs. Love it all!!
Thank you Katja! That's really sweet & encouraging!
WOW. Honestly this is so clever and so intoxicatingly beautiful! You really need to go into business designing light fixtures my dear 😉 The pink against the grey walls with the copper is amazing. Amazing job!! xxx
Thank you so much Kimberly! I'm so excited about finally having some more pink in my life! (I think I finally wore my husband down, lol.)
Wow! These are gorgeous Brynne! And I thought this was your site, but I wasn't positive until I scrolled down to see your name in the comments. Found you thru the Domestically Speaking link up…and this is reminding me that Thursday is approaching! Kyla @ http://houseofhipsters.com/
Hi Kyla – I'm so glad you clicked over! Yay! Thanks so much for you kind words & I'm looking forward to having you guest host Thrift Score Thursday with us 🙂
Love, love, love, love, LOVE THIS!!!!!!!!!!!! I'm giving you all my exclamation marks!!!!!!!!! 🙂
Thank you Sarah! I appreciate those exclamation marks!!! 🙂
wow wow WOW! Amazing, Brynne. Genius idea beautifully executed!
Thank you so much Alexis! <3
SO creative and COOL! I love this!! Great work girl!
Thank you so much Kate! 🙂
Wow, these are GORGEOUS! Love the candy colors and the pop they give to the room 🙂
Thank you so much Erica! They seriously are like lollipops for my wall and kind of make me crave sugar when I look at them 😉
Thanks for this fantastic tutorial post. We have been looking for something special for my daughters room and your idea is wonderful. You have a new blog fan.
Wonderful! I'm so glad you found the tutorial helpful! I'd LOVE to see pictures if you make them!
These are cool. Very, very cool! I can't even imagine the fussiness involved with CUTTING the ends of that tiny copper tubing! This one is stored away in my brain for when I have the right space/ stumble across some agate slices!
Thanks Charlotte! That part was the most nerve-racking – I was watching my dad make the cuts and kept yelling at him to watch his fingers, certain he was going to lose one or two! Afterwards, he mentioned that the scroll saw really wouldn't do any damage if he accidentally touched it. I wish I had known that at first, lol!
Your details are so plentiful & so clear that you must have been a teacher. But, you didn’t show anything about applying the copper leaf. Are there directions in the package?
Thank you so much, Judith! Yes, you can find those directions on the copper leaf package – the copper leaf will either come as individual tissue-thin sheets or with a paper backing (visit this post for application tips) which I prefer, but they both work very similarly. My best tip is to make sure you let the metal leaf adhesive dry until it’s VERY tacky before you apply the copper leaf.