
Does this sideboard look familiar? Probably. It’s had its fair share of face-time here on the blog so far. From plastic-y wood-grain laminate to white with gold leaf details to marbled paper decoupaged onto the door fronts… I’ll give myself props for trying, but I wasn’t quite able to get it right.

I loved the gold leafed edges, but I’ll admit, the marbled paper was a misstep for the dining room, and the white latex paint I used scraped and peeled horribly in just two years, despite my careful sanding and priming prep work (lens cap for scale):

So when Ace Hardware announced to the Ace Bloggers that October’s post theme was going to be a furniture makeover featuring Amy Howard at Home One Step Paint (in celebration of the line’s debut at many participating Ace stores), the sideboard was a natural subject.
I’ll be honest though – I was actually a little less than enthusiastic about the whole project at first. Like most people with access to the Internet (and more specifically, Pinterest), I thought I knew all about chalk-based paints – chalky, chippy, rustic, distressed. Not exactly words that I would use to describe my decorating style.
So I was honestly pretty skeptical that I would end up actually liking the end result. Wow, that sounds harsh! But I wanted to be 100% up-front about my reservations going in, because you guys…
I was SO WRONG!

Last month, I had the privilege of visiting the Amy Howard at Home workshop in Memphis with (almost all of) the other Ace Bloggers and I was able to learn various tips and techniques from the paint line’s creator, Amy Howard herself!
That trip was truly a life-changing experience and I’m going to be sharing more details with you soon. The short version: I couldn’t wait to delve right into this makeover as soon as I got home!
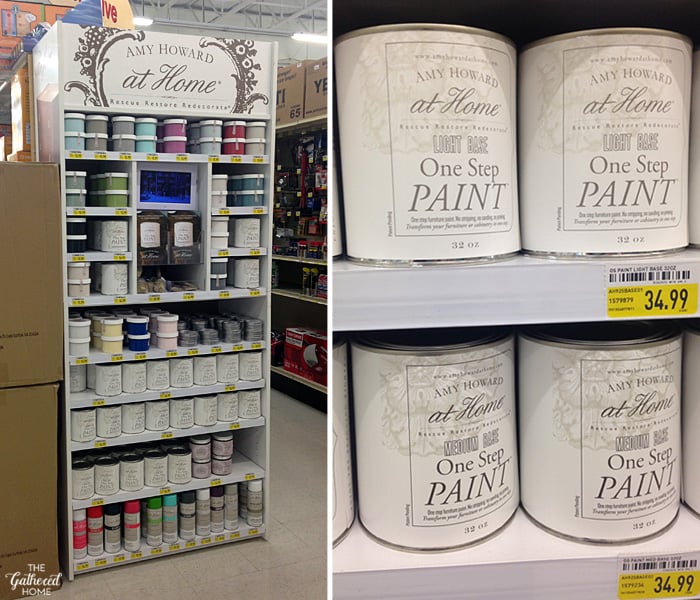
>> The Amy Howard display at my local Ace. While the One Step Paint comes in tons of gorgeous premixed colors, you can also get it mixed in custom colors at the paint counter as well!
My friends at Ace provided me with a gift card to shop in store, so here’s what I brought home for my project:
- Amy Howard at Home 32 oz. One Step Paint in Black – I ended up using 1/2 of the can for this makeover, if that helps you gauge how much paint you might need for your own project.
- Amy Howard at Home Light Antique Wax
- Amy Howard at Home Dark Antique Wax
- Amy Howard at Home China Bristle Brush

Clean with Simple Green
Instead of sanding, stripping or priming, the only step you need to do before you jump right into painting is give your piece of furniture a quick clean with Simple Green!
It comes in a concentrated bottle, so I mixed it with a little water, wiped down my sideboard with it, and rinsed with plenty of clean water.
>> TIP: Make sure you follow up with clean water to rinse ALL the Simple Green off the surface, or you might run into issues with the paint’s adhesion.

Amy Howard at Home One Step Paint
>>TIP: The paint’s solids can settle at the bottom of the can, so make sure to stir it well before use.
It’s really as simple as it sounds… The One Step chalk-based paint glides on incredibly smoothly! I only needed two coast, applied 30 minutes apart, for perfect coverage – and that was going from white to black!
Plus, One Step Paint is all natural and has no VOCs, so while I did decide to work out in my garage, I could also have painted indoors with no problem!

I wish you could reach through your monitor and feel the buttery, matte finish of this paint with me!
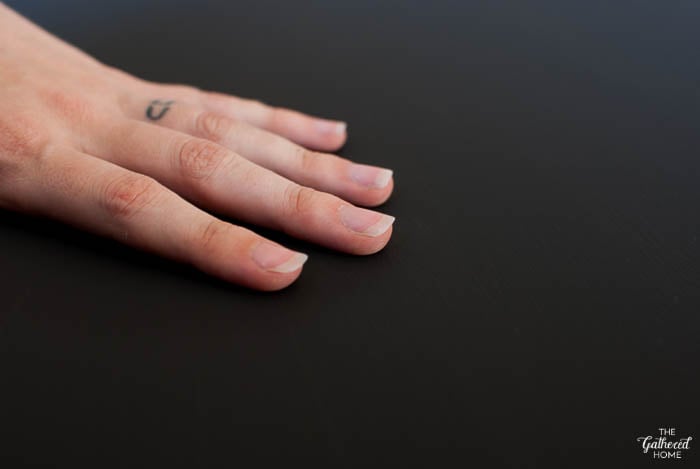
P.S. I decided to test how well the paint adhered with no sanding or priming by taking my fingernail and scratching the surface – while it left a lighter scratch mark, I couldn’t even get the paint to chip!
Now, at this point, you could call it finished and walk away with less than two hours invested and a completely new, gorgeous piece of furniture! That’s right – the One Step Paint doesn’t require any sealing!
Boom! Done! Easiest makeover ever!
But one of the beautiful things about the One Step Paint is that there are so many possibilities for ways to customize the finish with waxes, gilding and various techniques, so you can take a basic, simple makeover and turn it into a completely unique and extraordinary finished product!
Gold Leaf Details
At the Amy Howard at Home workshop, we had the opportunity to work on some gilded details and, guess what – I found out that I had been using gold leaf wrong this entire time!

*May contain affiliate links. If you shop through these links, it doesn’t cost you anything extra, but I may receive a small percentage to help keep The Gathered Home running!
By far the most important concept when it comes to gilding is letting your size (metal leaf adhesive) come to “tack” – that not-too-wet, not-to-dry, perfectly-sticky feel.
Prior to this, I always impatiently stuck my gold leaf down while the adhesive was still too wet. Unfortunately, when you do that, the adhesive never truly dries and just sits under the surface of the gold leaf.
This causes major issues later, which, spoiler alert, I ran into when I tried to apply a new layer of gold leaf over the old layer. It was not pretty. I actually had to sand the old gold leaf off and it was truly a pain because the adhesive had grown disgustingly gummy. The moral of this story: tack is your best friend.
However, when you allow the size to sit long enough to become completely clear and pull slightly at your finger when lightly touched, well, it’s pure magic!
So naturally, I had to add some gilded details to this sideboard. I already had some gold leaf on hand in my craft closet, so I decided to re-do the gold leaf edges on the front and add a gilded detail to the top.

>> TIP: Painter’s tape makes a great “stencil” for gilded details.
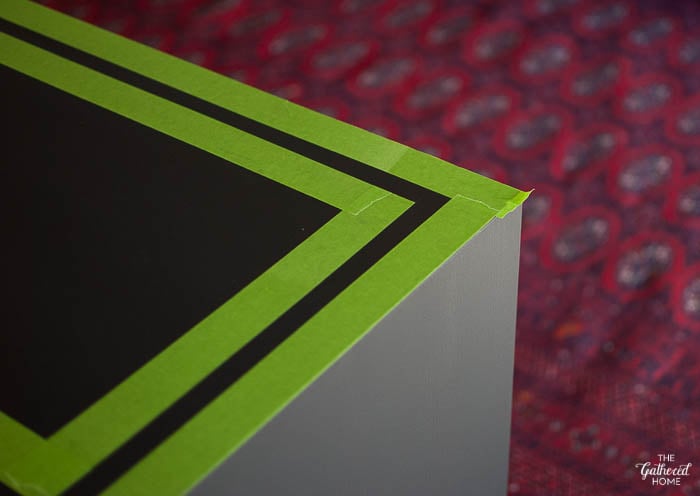
Step One: Lightly paint on the adhesive size and allow to come to tack. Work in smaller, manageable sections – I did around 12″ at a time.
Step Two: Cut your tissue-paper backed gold leaf into strips for ease of application.
Step Three: Carefully lay one gold leaf strip face down on the adhesive.
Step Four: Firmly rub the gold leaf down through the tissue paper backing with your fingertip.
Step Five: Peel the tissue paper backing away from the gold leaf.
If there are any spots where the gold leaf didn’t adhere well, you can press in a new piece with your fingertips or add a dab of adhesive, allow to dry until tacky, and then apply a new piece of gold leaf cut to size.
Repeat steps one through five until you’ve added all the gold leaf details.
Step Six: Use a clean paint brush to whisk away any excess gold leaf.
Step Seven: Gently peel up the painters tape, pulling directly towards you, for a crisp, clean line.
If you want your gold leaf to be shiny and perfect, you can leave it exactly as-is. I wanted mine to be ever-so-slightly distressed, so I rubbed it very gently with 0000 steel wool (not pictured).

Antique Wax
Antique wax on top of One Step Paint is like the cherry on top of a sundae… My favorite part!
It melds into the finish of the paint for an absolutely delicious sheen and feel!

Again, at the workshop with Amy Howard, I learned a few tips for wax application that were completely game-changing.
Too much wax is a common issue (yep, I’m guilty), so start by swirling a clean brush into the wax to load it up, then off-load the brush onto a scrap of cardboard before you even touch the piece of furniture.

>> TIP: Never go straight from the tin of wax to your piece. Always remove excess by swiping your brush across a piece of cardboard a few times.
Apply the light antique wax all over the piece by using gentle, whisking brushstrokes in a cross-hatch pattern. Allow to dry 45 minutes to an hour.
I decided to add dark antique wax details on top of my gold leaf, so I lightly brushed the dark wax over the gilded details, focusing on the edges. Again, use a very small amount of wax, applied lightly in a cross-hatch pattern.
>> TIP: Don’t use the dark antique wax over the entire surface of a piece – save it for areas where wear and distressing would naturally occur over time. This will help you achieve a sophisticated, authentic finish.
After the dark wax has dried for at least an hour, follow up with a wad of clean rags to gently buff the wax.

The Finished Piece:
I’ve never been so happy to be wrong before – the Amy Howard products completely blew away my misconceptions and preconceived notions! I was able to achieve a very sophisticated and glamorous look and it was such an easy and enjoyable process!
And now, I think I can say with confidence that my sideboard is finally finished and an absolute perfect fit for my dining room:


Are you inspired to get started on your own One Step makeover?
My friends at Ace are offering up a $100 gift card to one lucky reader of The Gathered Home! (That’s enough for all the supplies I used in today’s project, plus a little left over!) It’s easy to enter below (until 12am 10/27) using the Rafflecopter widget.
Open to U.S. residents, age 18+. Runs 10/20-10/27. One winner will be selected at random and notified by email and in this post. Winner will have 48 hours to respond or a new winner will be chosen.
![]()


 |
I couldn’t be more excited to be a member of the Ace Bloggers panel this year and to partner with Ace on this post! Ace Hardware provided me with the materials for this project and I was also compensated for my time and this post. All opinions and positions expressed here are my own and do not necessarily reflect those of Ace Hardware. |
Pin it if you love it!

WOW, brynne!!!! it is STUNNING and so perfect in there!!!!! love the black and gold- you were so right to go that way!
Thank you Cassie! I’m wildly in love with it now!
Beautiful job! I’ve had my own less than successful trials with make my own chalk paint but this credenza turned out beautifully.
Thank you so much Laura! I’ve never tried to make my own before – it seems like it would be tricky! If you get a chance to try the One Step Paint, I think you’ll love it!
This piece looks absolutely incredible as does your whole dining room! I would be very excited to try this, mainly because of the possibility of getting a custom color mixed.
Thank you so much, Ellen! Yes, the custom color possibilities are so exciting! And there are a few other premixed colors that I’m really excited to try in the future!
Loved the look of the black sideboard. I have only ever used Annie Sloan and Rust-oleum chalk paint. With AS wax you apply and immediately buff off but with the Amy Howard you have more time before you need to buff it off. Amy Howard chalk paint and supplies look like something I would love to try. Thanks for the information.
Thank you Mary Beth! I’m so glad the post was informative! I’m a chalk-based paint newbie, so it’s great to hear from readers with experience!
I’ve used this paint and you are right, the finish is like buttah! Simple to use, great colors! I always enjoy your blog posts!
Thank you so much Jo! It’s lovely to hear from you! I’m definitely going to reach for this paint for future projects – I didn’t mention this in the post, but we got to try painting fabric with it at the Amy Howard at Home workshop and I’m so excited at the possibilities!
It turned out AMAZING!!! Love all your lessons learned and great tutorial! So happy to have met you at the workshop!
🙂 Linda
Thank you so much Linda! I’m so glad to have met you as well! I’m looking forward to seeing your paint project!
Just wow! What a fantastic makeover that fits your style well. I’ve used other brands of chalk paint and even made my own DIY versions. I’m going to have to check out Amy Howard and especially the finishing products. Ace Hardware, here I come!
Oh thank you so much, Peg! I think you will love trying the Amy Howard products! Quick tip: when you view the products on the Ace Hardware site, you can input your zip code to see which stores in your area carry the Amy Howard at Home line since they’re not carried at every Ace.
I LOVE this is in black! I am shocked…how did you get all that decoupage off. Go you! It looks great and very Christine Dovey…if you get my drift.
Thanks Jess! So, funny enough – the paper came off insanely easily! I think the spray adhesive I used to attach it was old or something, because it did NOT bond well!
Oh, and I’m honored by the Christine Dovey comparison! She is one of my heroes!
Totally inspired!
I love chalk paint, and am excited to have a new brand to try.
I’m sold! Gotta try this.
Love this! I have a few furniture pieces I’m considering a re-do on and this looks SO much easier than traditional painting. I love your blog and all the awesome things you find! Your style is everything I want in my own house!
Thank you so much for your sweet words, Rhiannon! The One Step Paint is SO MUCH EASIER – I’ve been wary about starting painted furniture projects in the past because I knew how much time and effort they would take with latex paint, not to mention the potential for chipping and peeling paint later. So this is such a game-changer!
Your piece looks incredible!! I absolutely love the end result.
I tried Amy’s products at Haven and really liked them. We don’t have an Ace Hardware in town, so if I travel and see one, I’ll have to stop to check out her line.
Thank you so much, Paula! I hope you’ll get the chance to try her products – they’re so much fun!
Looks amazing! Can’t wait to try the paint on something!
Thank you so much, Cristin!
It’s perfect like this! Love the look
Thank you sweet Julia! 🙂
This was exactly what I needed to see in regards to this product! We have a side table that is in bad shape and I have wanted to do something easy to fix it. I love the lines but the top is ugly! I don’t want a rustic/aged look so I was afraid to use the chalk paint. Your sideboard is gorgeous!
Thanks for sharing with us.
Yay! I’m so glad the post was helpful! Exactly – I had always heard that chalk-based paint was great for easy makeovers, but had no idea it could be so modern. So many possibilities!
oh, wow–looks great! I will miss the marbled paper, but I understand….sometimes something can look great on its own but not work in context.
I was able to peel the marbled paper off without damaging it, so I’m sure it will make an appearance again sometime! I still love all the colors in it!
Looks great! Love the gold leaf details!
Thanks so much Caitlin! I think it’s so funny that I was on the right track with the gold with the first makeover… I just needed a little extra time to get the color right! 😉
Wow! This final look (I think I agree with you – it is a “final look”) is awesome! It does match perfectly with your dining room and I adore the color scheme. Thanks for teaching me so many tricks…I really need to try chalk paint, anything that has the words “one step” are appealing to me. Pinning!
Thank you Sam! 🙂 I know – the “one step” is a total game-changer for me as well, since I always want to dive right into a project and hate taking the time for prep work. I seriously couldn’t believe the whole thing was painted and ready to go in a short afternoon!
I have not tried her paints; would consider it for a chest of drawers I need to repaint. thanks for the chance 🙂
Oh wow! That turned out so beautiful! I have an old corner smaller hutch that I would love to do that too! I would love to try the Amy Howard One Step paint!!!
Thank you so much, Laura!
Looks beautiful! I would love to try Amy Howard paint!
Wow! That’s gorgeous. I would love to try this paint. No matter how well I prep furniture, it eventually chips 🙁
I couldn’t find the rules for entry, so I hope this is open to Canadians?
Hi Mel – due to giveaway regulations, the giveaway is only open to U.S. residents (there should be a link to the official rules in the Rafflecopter widget). I’m so sorry about that! There are a lot of extra regulations that govern international giveaways 🙁
Thank you for your sweet comment and I’m sorry I had to be the bearer of bad news!
All the best,
Brynne
Love it!
Ohhhh I loved the marbled paper but THIS. Oh yes this is stunning. You did a beautiful job!! xxx
Thank you girl! I’ll definitely find another use for that marbled paper (I was able to salvage it from the door fronts) because I love it too! Just not as much as the black and gold now, haha 🙂
You did such a great job! I too have always been skeptical of chalk paint, but had heard it was easy to use. I might have to try this on a piece to sell! Any brushstroke issues? Thanks for sharing!
Thanks Leah! I did end up with some light brushstrokes on the finished piece, although the One Step paint does a pretty great job of leveling out on its own. I like the little bit of dimension they give, but my friend Michelle at 4Men1Lady used a foam roller for her One Step Paint project for a super smooth finish, so that’s always an option to avoid brush strokes entirely!
Thanks Brynne!
Soooo glad I read this post, because I was right there with you in my feelings towards chalk paint. “Rustic and chippy” sounds great for an old vintage ranch truck, but not my furniture!
That sideboard is so clean and elegant though! I will definitely be giving chalk paint a try!
Haha! Thank you Tina! I was so happy to discover how many different finishes you could create with the One Step Paint!
I love what you did! I just bought a dresser at Goodwill the other day that needs a makeover and I might have to borrow your idea and do something similar. It looks great!
Thank you Emily! I hope you’ll share pictures when you’re done with your new dresser!
Wow, I liked the no-primer, no sealant idea if chalk paint paint before, but I thought it was chippy and pastel and only “shabby chic” as well! This is the first time I’ve seen it it so dark and even and dramatic. You’ve really opened my eyes!
The post was awesome and I would love to try Amy Howard One Step paint!
Amazing! I have to say I liked the marbled version too, but the black and gold is just killer. It’s perfect against those fabulous green walls. I love Amy Howard’s products as well – great quality and gorgeous colors.
Thanks Arielle! The marbled version was fun, but it just felt too crazy-town for this room. I still have the paper though and just might try it somewhere else! 🙂