Subtitle: From “Death Trap” to “Delightful.”
When we first moved into this house in the summer of 2013, we were so excited to have our first garage and to be able to park inside. Fast forward a few months, to moving boxes (unpacked and some still packed), yard equipment, and just all that random stuff that houses seem to accumulate so quickly , and suddenly, parking in the driveway seemed to make a lot more sense.
Fast forward two years, and the situation was getting out of control.
For your viewing pleasure…

Boxes, building supplies, furniture, things I removed from the house (like six sets of vertical blinds), tons of leftover paint, piles of perpetually homeless tools… Basically, just a dusty, dirty, spidery unorganized pile. In person, it was much worse than it looks in those bright and sunny photos up there.
It was hard to find anything I needed for projects and risky to navigate. With images of my grandpa’s efficient and completely customized workshop fresh in my mind, I felt especially annoyed by the state of my own workspace.
So when Ace Hardware asked the members of the Ace Blogger Panel to tackle a larger, more involved home improvement project this summer, I knew it was finally time to face the beast.

This is actually Phase 1 of a 2-part garage makeover, but what an improvement, right?!
Ace Hardware provided me with the supplies needed to whip my garage into shape, but the blood, sweat, and tears were all mine.

And oh, did I sweat.
It’s kind of a Catch-22. We definitely have more free time in the summer, making it the perfect time logistically to take on a larger project like this. On the other hand, it’s the summertime in Texas, so it’s the most unpleasant time of the year to do anything but sit inside in the air conditioning.
The Environment
That’s why the very first thing I brought home from Ace Hardware to facilitate this makeover was a large Lasko box fan, which proved to be a lifesaver time and time again, especially when it took me five days to paint the garage! This guy has three settings, and the highest is definitely powerful enough to send air from one end of the garage to another.

The Walls
After making sure I wouldn’t die of the smothering heat, the first item on my agenda for our dark death trap of a garage was to paint the very dirty, damaged, drab walls a brilliant, pure white.

I used Clark+Kensington’s interior eggshell enamel (a paint and primer in one) in off-the-shelf “Designer White.” I didn’t want any tint to it, so not only would it be as bright as possible, it would be easy to grab more later for any future touch ups. I was seriously surprised that it only took me two gallons to paint the entire garage, and that I have almost half a can left over!
The white seemed like a subtle change from the previous color, but it made such a difference! The walls reflect so much light, they practically shine.

The Storage
Storage was an essential element of this garage makeover, since we were basically starting out with piles and piles of crap that I couldn’t put away because they had nowhere to go. “Everything in its place” only works once you’ve created “a place for everything.”
We started out with some rickety, sagging fiberboard shelves on the wall near the door in the garage, but they were in such sad shape we took them off the wall before painting and hauled them off to the dump.

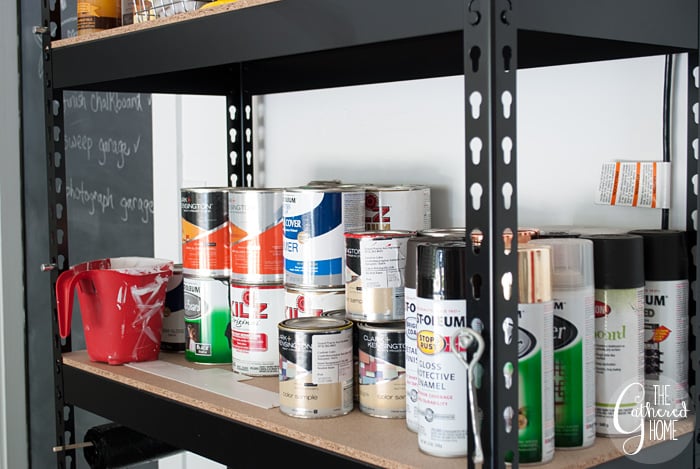
Once I patched the holes left behind and painted, I put together the Colossal Rack 5-Shelf Unit (by myself – it all snaps together rather ingeniously), weeded through my paint collection, and then came up with an organizational system that was perfect for all my painting, staining and furniture restoring supplies.
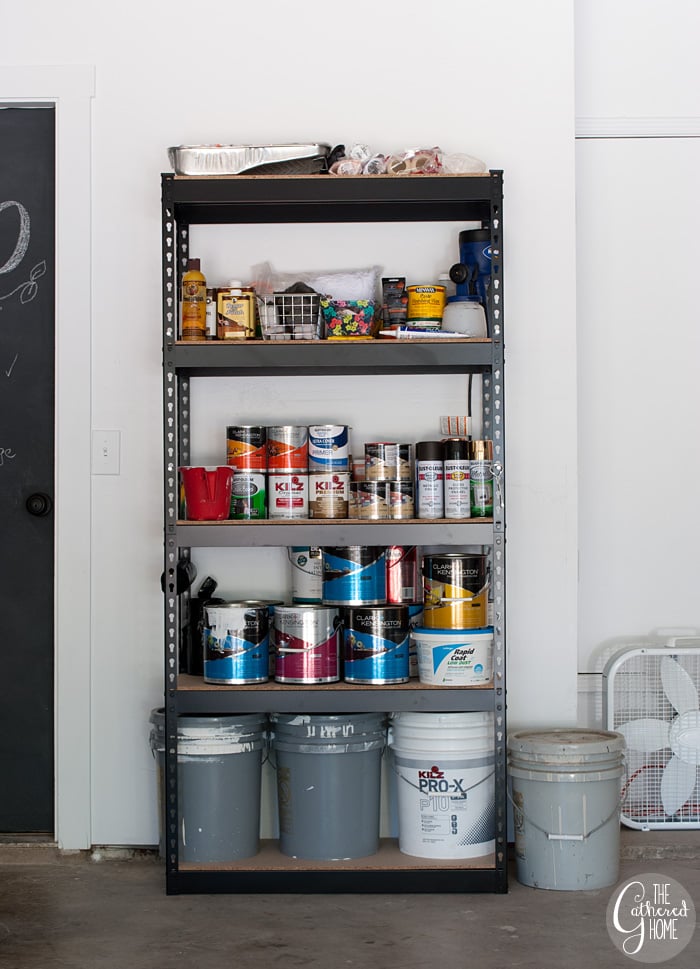
It’s amazing how much can fit in those shelves!

I even used a leftover wood dowel to create the perfect dispenser for our roll of garbage bags!

Over to the right of the door, I borrowed an idea from Sarah at Ugly Duckling House and hung some white metal brackets (being sure to drill into the studs) to hold my lumber pieces.
And a pile of leftover vertical blinds that I’m convinced I’ll use one day when I dream up the perfect upcycling project.

Brooms and other vertcally-oriented items got a brand new place to live with this Crawford tool organizer.

The Command Center
The door leading from the garage into the house was pretty filthy. Decades of grime refused to budge, even with a fair amount of elbow grease.

^ See how I didn’t even bother watermarking that photo? ^
It was fine, though, because I had been dreaming for a long time of turning the door into a large chalkboard, perfect for keeping track of projects and shopping lists.
Luckily, I just so happened to have a can of chalkboard paint sitting around, a swag-bag favor from the Haven blogging conference last summer…

When Bryan saw my to-do list, he questioned the paradox of the item, “finish chalkboard,” since in order to write it down, the chalkboard had to have been finished already. You caught me, Bryan. But it’s just fun to check things off a list, even if you’ve already completed them.
The Work Bench
This is the part where I make apologies for not having “before” photos of the work bench.
I had it in my head that I had snapped some already and it was really really hot and I just wanted to finish painting that day, so I pressed on without stopping.
The work bench was already built-in to the back wall of the garage, and even had pegboards already installed, so all I had to do was clear away all the junk that had accumulated back there and give everything a fresh few coats of paint.
For fun, I decided to paint the pegboard with one of the pint-sized color samples I received for May’s Ace post, OPI’s “Cajun Shrimp.”
Sidenote: I love the slightly-larger-than-usual size of the Clark+Kensington samples! $5 gets you the perfect amount of paint for those projects that are on the smaller size.

The red color adds tons of energy to the nook!

Once the paint dried, I was seriously giddy with happiness over plotting out my pegboard organization. I brought home a 43-piece pegboard organizer kit from Ace, which was great because it gave me all the basic pieces I needed. Later, when I need to, I can go back and shop for individual hooks, brackets, and holders to add to my collection.
This was seriously my favorite part of the makeover. I want to pegboard my entire life!


I gave the grungy old fluorescent light fixture a facelift with a coat of black paint.

I had ridiculous (and possibly concerning) amounts of fun finding a place for everything.


Finally, I’m not sure I’ve mentioned enough on this blog how much I adore little drawers. Like card catalogs. Filing cabinets. Etc.
So another organization tool I was psyched to add to my arsenal was this 60-drawer parts storage box.

60 drawers!
Heaven!
Naturally, each drawer required a colorful washi tape label, applied in a “random” (but carefully calculated) pattern.

Now I have literally no excuse for misplacing a tool or not being able to find the right little part for future projects!
And my likelihood of being mauled by spiders while locating the correct tool or part has gone down considerably, while my likelihood of spending time in the garage and not setting up shop on the kitchen floor instead has drastically increased.
Ready for the “before” and “after” one more time?
So, you might have noticed from the beginning of the post that this is merely “Phase 1” in our garage makeover… It’s true, I have even bigger plans for this space – I can’t wait to share with you soon!
But for a little while, I’ll be on the couch, basking in the A/C.
![]()


 |
I couldn’t be more excited to be a member of the Ace Bloggers panel this year and to partner with Ace on this post! Ace Hardware provided me with materials for this project, and I was also compensated for my time and this post. All opinions and positions expressed here are my own and do not necessarily reflect those of Ace Hardware. |
WOW! can you come do mine? i am insanely jealous of it- amazing! 🙂
Thank you so much, Cassie! I only wish I had tackled this sooner – it’s crazy what a difference some fresh paint and actually taking the time to organize stuff made!
WOW about covers it! Love the Cajun Shrimp – definitely adds style!
Thank you Guerrina! It’s such a great red – and I’m not much of a red person, in my decorating, but I’ll definitely have to use it more!
WOW Brynne!!! What a difference!! You made that garage shine!!! Love your makeover!!
Thanks so much, Katja! It’s so nice to be on the other side of all that hard work and get to enjoy it now 🙂
Girl what a transformation. I really like the red peg boards and adding a little black paint to that work light brings it up a notch for sure! What a 180!
Thanks girl! Those pegboards are my favorite thing ever!
So jealous!!!! I need a garage to organize and paint right now! Also, I feel you on the heat over here in FL. Just painting a side table requires a shower after Ugh.
So many showers, haha! We had a few drizzly days and it was a trade off – less heat but so much more humidity! I’m so glad all the heavy-duty projects are done in there before temps continue to rise in August!
I am mostly jealous of all your thrifty craigslist scores…but this time I am REALLY jealous of your organization. Our garage is a MESS and so embarrassing. We need to get our act together. Great job!
Thank you Trina! We had amassed so much crap – it felt so good to finally load up the truck and haul it away! And I say that as someone who is passionate about repurposing and saving old things – some things I just needed to NOT hoard any further! 🙂
oh wow, you just did a great job with your garage!! i am so getting mine organized asap! i am inlove with your peg board organizer and i love how bright it now looks after painting it with white!
rea
Thank you so much, Rea! Good luck on organizing your garage – you will be so happy when it’s done!!!
I am having serious, serious garage envy right now! Ours is kind of out of control and I long for a space like this! What an awesome makeover!!
Thank you so much! Before I avoided opening the door at all costs (something was likely to fall on me!) – it’s the little things, like being able to enter your garage without fearing for your life, right? 😉
We cleaned our garage 2 weekends ago. It felt so adult! Ours isn’t as sparkly as yours, but it’s a million times better than it was. There’s something about having an organized garage though. So great! Also you always need to put something you can immediately check off on a to do list. The snowball effect or something?!?!
I do feel like such a grownup now, haha! Speaking of the snowball effect – halfway through working on our garage, I noticed our neighbor across the street began working on organizing his! Woohoo!
Love it Brynne… Especially the chalkboard garage door! What a great idea for a flat panel door!
Thank you, Karrie! It was such an easy way to dress-up a pretty boring door!
ah! it looks so good! I love the red pegboard, and I super love the individually labeled drawers! It reminds me of my very favorite Berenstain Bears book from when I was little: The Berenstain Bears and the Messy Room 🙂
That one sounds familiar… If that’s the one I’m thinking of, I remember always being inspired to put things in order afterwards! I’ll have to dig it up at my parents’ house next time I’m over there!
Oh wow!! What a transformation!! We have 2 little areas in our cellar that are little STUFFED with just random crap and we keep saying we need to organise it and we just can never face it. I love all your little organisation solutions and it just looks so TIDY!! Maybe this is exactly the impetus I need to get off my backside and just do it already 😉 xxx
Thanks so much Kimberly! I’m so glad I finally tackled it – it’s such a nice feeling to walk into an organized space now that’s wide open for new projects!
I really love the pegboard and the painted light. Can you describe how you painted each? Did you use a roller and did it drip much through the holes, on the pegboard? What did you use to paint the light?
Thanks so much!
Thanks Patti! I used a paint brush for each, loaded very minimally with paint. Several very light coats left no brush strokes and meant there was no excess paint to drip through the holes! For the light, I would have preferred to take it down and spray paint it, but the cord ran behind the pegboard which I was also trying not to have to take down 🙂 The pegboard could also be spray painted though, which would speed up the process. It was just easier for me to paint everything in place since it was all already installed!
What happened to the lawn mower? The update is awesome. I plan on remodeling my basement/garage into a one bedroom apartment for myself. I will need a contractor to do the electrical and to put in a shower. But then I won’t have to climb any stairs to get into my home as my health is beginning to demand. Any ideas?
Thanks Karen! The lawnmower didn’t make it into the picture, but we ended up storing it on the right side just inside the garage door, along with other lawn and garden supplies