Hey you guys! Welcome to June’s edition of “Knock Out Knock Offs” – the fun summer series I’m participating in with a few blogging friends!

Each month this summer, we’re sharing DIY projects inspired by some of our favorite home decor stores! Last month’s theme was Anthropologie – this month, the inspiration store was The Land of Nod. Now, Land of Nod carries kids furniture and decor, and we don’t have any kiddos over here just yet, but I’m always up for a challenge!
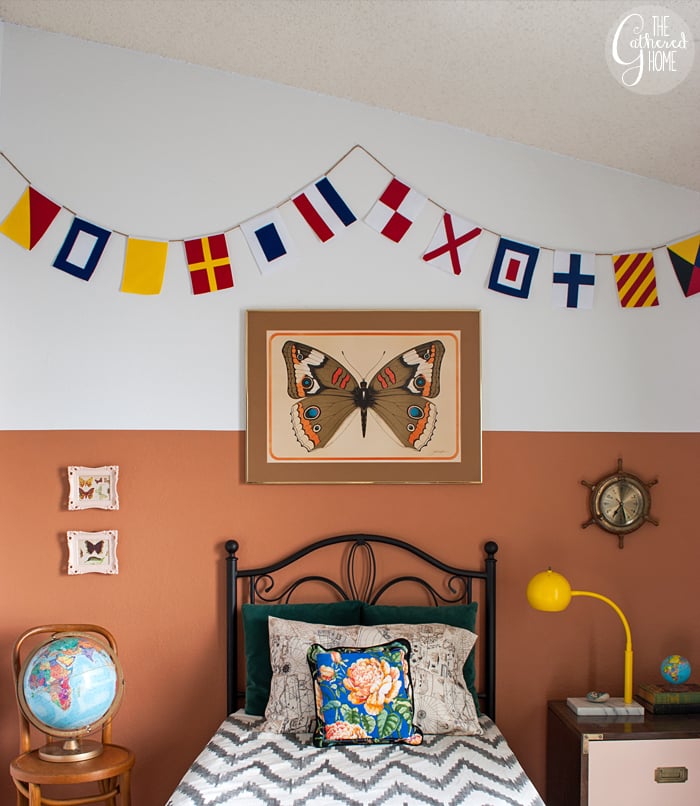
Last week I shared our “Nautical Naturalist” guest room – a kid-friendly room design that whimsically combines flora, fauna and oceanic-adventures. So when I spotted this nautical flag banner on the Land of Nod website, it immediately jumped out at me as the perfect way to finish up the guest room!
The Land of Nod version includes 9 flags for $32. My DIY nautical flag banner includes every letter of the alphabet, and I made it for under $15!

Making 26 different nautical flag designs seemed a little daunting at first, but this project was actually very simple to create. I decided to use felt to make my banner – it’s affordable, easy to work with, and there’s no sewing required!
*Today’s post may contain affiliate links. If you make a purchase through an affiliate link, I may receive a small commission. You can read my full disclosure here. I hope you all know by now that I do only share things I really truly love!
Supplies:
- 3/4 yard white felt
- 1/4 yard each royal blue, red, and yellow felt
- 2 pieces of 9 x 12″ felt squares in black
- Fabric glue
- Jute twine (I still have tons leftover from May’s post when I bought 3,000 feet for just $25!)
- Large wooden beads – optional, but I used one on each end of my banner to finish it off.
Tools:
- Rotary cutting set – I found these really streamlined the process of cutting out all the felt shapes!
- Low temperature glue gun + glue sticks
Step 1:
The flags in the Lane of Nod banner are 9 x 13″, but that seemed a little large for the use I had in mind. I made my flags 6 x 9″ each, so I started by cutting my white felt into 6″ strips, then down to 9″ tall.


Step 2:
I kept an image of the nautical alphabet open on my phone while I worked. The white background is 6 x 9″, but I planned each flag pattern to fit within a 6 x 8″ area to leave a border on top for stringing the flags later. Each design is composed of simple geometric shapes, so I had to do a little math to figure them out…
Lucky for you, I saved all my measurements and created a handy collection of printable nautical flag templates for you! (No sewing AND no math required – can a project get any better?!)
Inside, you’ll find cutting patterns as well as measurements for each flag design!
>> Get the printable PDF zip file right here <<

Step 3:
Cut out each flag’s patterns from the colored felt and attach with glue to the white banners.

Step 4:
Measure out about 3 feet of jute twine as the “tail” of one end of your banner. I wanted my flags to display alphabetically from right to left, so I started with “Z”.
Place each flag face down and fold the top white margin over the jute twine, securing it with your glue gun. Try not to get any glue on the twine – this way, the flag will be able to slide along the twine, so you can reposition each one.

Space each flag around 4″ apart on the twine, working your way backwards through the alphabet. When you finish, measure out at least 3 feet of twine for the second “tail.”
Step 5:
Hang your banner! I used thumbtacks, but I think I’m going to switch to little screws to make sure it stays up. Those 3 feet of slack on each end of the banner will help you arrange each flag on the banner – once you’ve decided how you’re going to hang it, you can slide each flag around until it looks perfect!
Once you’ve finished hanging and arranging the banner, you can slide a large wooden bead on each end of the twine, tie a knot beneath it, and trim the excess twine to a pleasing length.
I hung the banner wrapping around two walls of the room – over the double doors that lead into the room, around the corner, and above the headboard wall. It’s a tiny room, so it’s hard to get a good wide-angle shot, so these next few photos will give you a fun little look around…

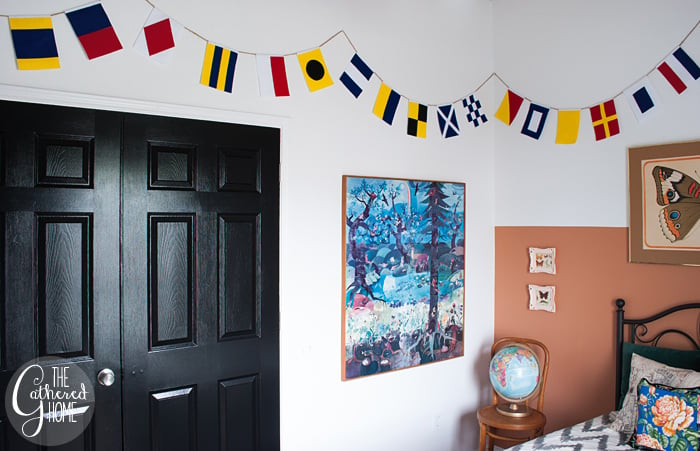


I love that the flags echo the colors in the room – yellow, blue, and they even bring out the little bit of red in the butterfly art!

So what do you think? This would be such a fun (and educational) summer project to work on with kids, wouldn’t it? I think this banner would make a great party decoration as well!
![]()


Ready to check out the other Land of Nod-inspired DIY projects?

Delineate Your Dwelling // Designer Trapped In A Lawyer’s Body // Bigger Than The Three of Us
Upcycled Treasures // The Gathered Home (you are here!) // Brave New Home
Pin it if you love it!

Oh I love this. My son has his flag banner in his room. You are so good at making these step by step tutorials
Thank you Julia! Banners are so much fun to decorate with… I want to make more now!
This is adorable! I’m not sure I’d have the patience for this but we’ve already established you’re the more patient one in the relationship. 😉
Haha, thanks Michelle! I’ve never really considered patience to be one of my strong points – Bryan makes fun of me for complaining when Netflix takes too long to load! Maybe I have a very selective sort of patience… 😉
Not only was yours less expensive, you were also able to make the chain as large as you wanted. Love how they drape around most of the room!
That’s one of my favorite parts! Originally I was thinking of zigzagging it down one wall, but the border up top worked out so much better! Thanks girl!
I love nautical banners and yours turned out so colorful and fun! Great DIY.
Thanks Amy! Love this series and I LOVED your project!
Love this! And it just keeps going forever! Everything in this room is bigger than I expect 🙂
Thanks Gretchen! It’s actually a really teeny tiny room! I was scrunched up against walls and in corners for the photos – but the banner draws attention to the high ceilings and helps make the room feel more spacious in real life (and in pics, I guess)! It also helps that I can open the double doors and get pictures from the hallway outside the room too 🙂
This is amazing! I’ve actually swooned over these flags at Land of Nod – your version looks amazing!
Thanks so much Kim!
i love this so much! i always love these knock offs!
Thanks Cassie! I love participating in this challenge – it’s so much fun!
Love!! It looks so much like the original. Love that half painted wall as well! Pinning!
Thanks so much, girl! I don’t know if you saw it in the post about this room makeover, but your guest room with the 2/3 walls was totally my inspiration!
This turned out great and I love the color and character it adds to the room!
Thanks Katie! I don’t typically use many primary colors around the house, so it was fun to go all-out in this room!
Love this! Think of how cute it would be in a classroom too! Geography teachers be warned!!
Oh yes! I think it would be so fun to do a flags of the world version, too!
I love this so much–what a great idea! I’m also a big fan of your curtains. Can I inquire where you got them? Thanks for sharing!
xx Hannah // TheCheapishly.com
Thank you Hannah! The curtains are actually vintage (I think) Fieldcrest flat sheets that I picked up at the thrift store for $3 each!
This banner is perfectly nautical! Thanks for the PDF template!!
Thanks Jenny! I’m so glad you like it!
I saw these on another site, she used the flags to spell out her son’s name. Do your flags spell anything significant? I have a son who has always been fascinated with the Titanic, I’m redoing his room with a slight nautical flair and want to make flags spelling out his name =)
Hi Tori! I decided to do the entire alphabet, so it goes A-Z starting in the corner over the door. Spelling out a name would be such a great idea!