Welcome to Round 3 of this year’s edition of “Knock Out Knock Offs” – a summer series where several blogging friends and I take on DIY projects inspired by some of our favorite home decor stores!
So far this year, we’ve tackled Anthropologie and Land of Nod – if you haven’t caught up on those rounds yet, you definitely don’t want to miss them! This month’s theme was CB2, and I have to admit, it was a bit of a stumper.
CB2 has some fantastic home decor items that I’ve definitely drooled over in the past, but when it came time to choose a project, I was at a complete loss for ideas. The items I was drawn to were either priced so reasonably a DIY version wouldn’t make financial sense (which is actually kind of great, by the way, CB2) or not DIY-able (for most of us, at least, who lack welding experience).
I think I spent three or four hours viewing every single item on the CB2 website before envisioning a way I just might be able to translate their Wallflower Wall Hanging into a DIY project.
To my surprise, it actually worked!

And then there was a point on Thursday where it absolutely fell apart and I panicked because there was no time to create something different so I had to keep my cool and fix it and to my surprise, again, it actually worked…
So basically this is a classic feel-good tale about overcoming adversity and never underestimating yourself.
(Which makes me think of this clip from The Office, of course. But, I digress.)
Are you ready to learn how to create your own DIY “metal” flower wall hanging? Don’t let my difficulties throw you – it’s actually a really easy DIY with only a few supplies necessary!
DIY version: <$20 (well under, depending on what you have on hand).
CB2: $199.
Yep, I thought so!
*Today’s post may contain affiliate links. If you make a purchase through an affiliate link, I may receive a small commission. You can read my full disclosure here. I hope you all know by now that I do only share things I really truly love!
Supplies:
- 1/4″ x 36″ wood dowels – I ended up using 6 for this project.
- 12″ Bamboo skewers – I bought 300 and ended up using less than 100. Kabobs, anyone?
- A piece of scrap cardboard, like the back of notepad.
- Rustoleum Bright Coat Dark Bronze spray paint – if you can find it locally, it will be a lot cheaper, but this particular spray paint is awesome and looks just like steel!
- Gold acrylic craft paint

Tools:
- Hot glue gun + glue sticks – I’m going to specify a hot glue gun here, because my big disaster halfway through the project happened because I use a cool-melt glue gun.
- Hacksaw + miter box (or cutting tool of your choice.)
- A piece of 100-grit (or so) sandpaper
Step 1:
Cut your dowels down to size. I completely eyeballed this, laying dowels across each other to arrive at a pleasing pattern, and then cutting them down to length.
I rested the dowel across my plastic miter box so it wouldn’t move and then used a hacksaw to cut through it – this worked well and was a good solution for me since I don’t have any power cutting tools of any kind.

Set the sandpaper on a hard surface and scrub the cut end of each dowel on the sandpaper to smooth it out.
Step 2:
As you are cutting your dowels down, begin arranging them in an overlapping pattern. I used the CB2 version for reference, but decided to simplify the design a great deal. The more times the dowels overlap, the stronger the design will be. Glue your design together, and be generous with the hot glue at each joint!

Step 3:
Now it’s time to make the flowers. Start by cutting circles out of your scrap cardboard – roughly the size of quarters. You’ll want one circle for each end of the dowel at the top of your design.

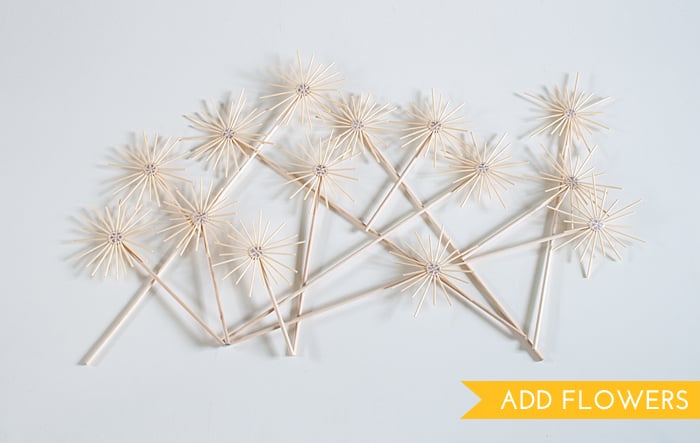
Next, cut the skewers into pieces to form the flower petals. I found that it took 20 skewer pieces to form each flower and I settled on doing 6 longer petals and filled in with “medium” and “short” petals in a random design. No measurements necessary – free form is just fine! Use the sandpaper again to quickly smooth the cut ends of the skewers.
Attach the skewer “petals” to the cardboard circle with hot glue. Then, create the center of the flowers by spiraling a thick circle of hot glue on top of the skewer pieces.

Step 4:
Glue the flowers to the ends of the dowels.
Step 5:
Carefully transfer the wall hanging to a piece of scrap cardboard and take it outside to spray paint, preferably in the shade.
This is where I ran into problems with my cool glue gun. It’s approximately one-million degrees outside here in Texas and I was spray painting in the afternoon sun. When I picked the wall hanging up to bring it back inside, most of my joints separated, since the hot sun had weakened the cool-temperature glue. I was able to glue it back together, but I think if I had used a higher-temperature glue and kept it out of the blazing hot sun, I wouldn’t have run into this hiccup.
Tip: Before you spray paint, use a stiff-bristled paint brush to help remove any wispy hot glue strands. Use the brush again afterwards, since the spray paint will show you all the strings you missed!

Step 6:
After the spray paint has dried, use the gold craft paint to liberally paint in the gold centers of the flowers. You can really glob it on and let it drip a little – the CB2 wall hanging has centers that were created by dripping molten brass, so this was my take on that.
Allow the gold centers to dry for several hours.

Step 7:
I laid my finished wall hanging on a large piece of paper (try a piece of wrapping paper) and used pencil to mark several inner points of the wall hanging. Then, I taped the paper to the wall and hammered a finishing nail through each point. Finally, I rested the wall hanging on the nails.

The Finished Project:


I really love how it turned out! Without super close scrutinization, you would never know it’s just wood dowels and hot glue. High impact wall decor + low cost makes it a perfect project in my book!
![]()


Ready to check out the other INCREDIBLE CB2-inspired projects?

Designer Trapped In A Lawyer’s Body // The Gathered Home // Upcycled Treasures
Bigger Than The Three Of Us // Delineate Your Dwelling
Pin it if you love it!

that looks amazing, brynne! i always just love your vision and diys.
Thank you so much Cassie! *big hug*
What great tutorial! I can do this and fully intend to make it. Thanks!
Yay, I’m so glad! I’d love to see pics of yours!
Perfect!! And way to recover halfway through… always a scary moment. Love the gold centers on the flowers, too.
Thanks Amy! I knew everything was going too smoothly up to that point, haha 😉
That looks so good! just perfect above the bed, too 🙂
Thank you Gretchen! I knew I wanted to make this before I knew where it should end up in the house… I was amazed at how perfectly it works in the bedroom! 🙂
Perfect location to hang your piece. The supplies you used are totally genius!! Bravo on making it your own and scaling it to fit your home (at a fraction of the cost).
Thank you sweet friend! When I was brainstorming I was like, “Surely it can’t be that simple?” and then it really was that simple (minus the hot glue hiccup in the middle)! I think it would be so fun to play with the idea even further by changing up colors, shapes or even just making single flower stems to display in a vase or something…
wow i am so impressed with this is awesome, i want one too xx
Thank you so much! You should definitely make one – it’s super fun and a great afternoon + Netflix kind of craft 🙂
I’m impressed… like really impressed. I totally love it and it’s so perfect in the room. ps. The photography is outstanding in this post! I really need to up my game for the in-progress shots.
Thank you so much Ashley! And thank you for your compliment on the photography – I recently buckled down and have been forcing myself to shoot in manual and really take time to figure out each shot! It’s so nice to hear that’s paying off! 🙂
WOW, Brynne! I am blown away! Joe wanted me to tackle this for our CB2 month and I said, “No way! I have no idea how I would do that.” So my hat is off to you! It is amazing!
Thank you Tasha! I was so stumped for what to create – when I thought I could maybe make this with dowels and hot glue, I was seriously second-guessing the plan. Thank goodness it worked! 🙂
You knocked this out of the park, Brynn! Great job and it looks so nice over your bed.
Thank you so much Paula!
It looks so intricate for such simple materials!! Love it above your bed too! Great knock off!
Thanks Amber! I’m seriously amazed that dowels + hot glue came together so well – I was definitely skeptical until the very end!
So good! I love your DIY solution, and I agree with Ashley, your photos are looking amazing!
Aw, thank you so much Alexis! I’ve been spending a lot of time getting to know my camera lately – I feel silly for putting off learning to how to shoot in manual mode for so long, but I’m glad it’s paying off! 🙂
Wow Brynne this turned out amazing and for $20, are you kidding me?! I looooooove how this looks, especially in your bedroom and your tutorial looks super easy to follow, yay! I totally agree with finding it difficult to pick a “knockoff” project from CB2 because a lot of the items really are reasonably priced and make me think, is my time really worth DIYing it, or should I just purchase it? I guess it also comes down to how much you will enjoy creating the project and if you already have some items needed to create it. It’s not too often you find shops with unique pieces that are actually affordable!
Thank you so much Katie! Yes, I typically steer clear of projects that will cost almost as much as retail, unless I’m somehow perfectly adapting the idea for my space. I added so many things from CB2 to my wish list during my time spent combing the site for ideas!
gorgeous and so creative!!! i love how they turn out – such an awesome transformation !! xo
Thank you so much Ananda! It was so much fun!
very nice! I think you replicated it perfectly!
Thanks so much Corinna!
Oh wow, really nice!! I would love for you to share this at my link party Making Memories Mondays going on now! There’s a great cash giveaway too!
Cathy
Thank you Cathy!
It looks fabulous! I absolutely love it framed by the gorgeous bed. And I applaud you for choosing the inspiration and going for it.
Thank you so much, Michelle! I love that this series makes me stretch my imagination and DIY muscles 🙂
Oh, this is definitely a must try project and I created a board on Pinterest just for it! It’s so striking, yet deceptively *appears* pretty easy to do. I must also say I do love a “he-he project”, as I like to call them, of a pricier version which seems I’m always drawn towards. Thanks so much for the tutorial.
Mary
This is so cool! And I like yours better than original. Well done.
Thank you so much, Cathi! It was super fun to make!