
I’m so excited to be participating in another round of Swap It Like It’s Hot, a week-long blog hop series orchestrated by Charlotte from Ciburbanity where 40 bloggers shop and swap mystery thrift finds and then give them the old Cinderella makeover. Today is Day 1, so be sure to check in throughout the week and follow #swapitlikeitshot on Instagram so you don’t miss any transformations!
>>Check out my Swap It Like It’s Hot post from earlier this year!
If you’re visiting from Run To Radiance, welcome! My sweet friend Tania sent me the most perfect thrift finds to work with. Hopefully Allison at Two Thirty Five Designs had fun with the thrifty grab bag/box I mailed to her! After you’re done here, pop on over to see what she did with the supplies – I’m dying to see if the plastic dinosaurs made an appearance!
We each had a $10 – $15 budget, so here’s what Tania sourced for me to work with…
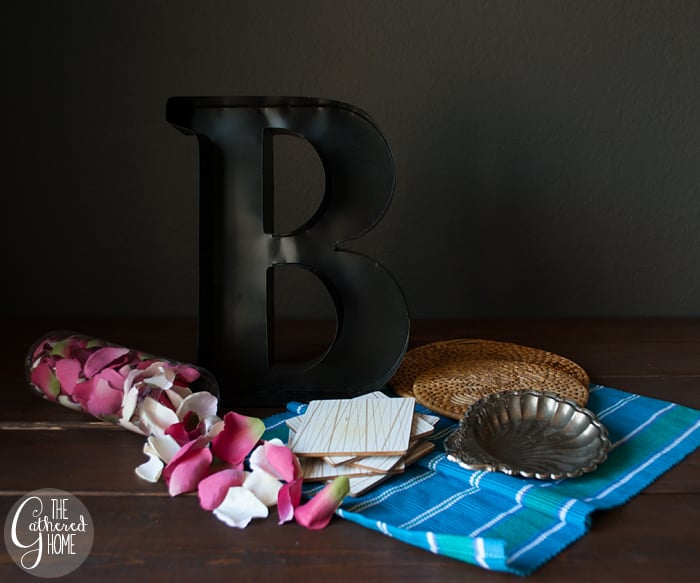
Of course, I immediately fell in love with the awesome metal letter B! How perfect is that? We weren’t tasked with combining all the finds together, so I decided to focus on the letter and the coasters for this round, although I’m sure I’ll eventually come up with ways to use all the fun finds in my home!
The funny thing is that I didn’t end up using the silk rose petals in my project, but they were actually the inspiration for the whole thing! Paired with the metal B, they immediately reminded me of the DIY flower letters I’ve seen floating around on Pinterest, which got me thinking along that track.
DIY Rusted & Mossy Letter

I wanted to age the metal B (I believe it was initially from a craft store) and make it look more like a salvaged piece, so I was glad for a chance to pull out a few craft supplies I’ve had in my stockpile for years now…
*Today’s post may contain affiliate links. If you make a purchase through an affiliate link, I may receive a small commission. You can read my full disclosure here. I hope you all know by now that I do only share things I really truly love!
Supplies:
- Iron Metallic Surfacer
- Rust Antiquing Solution
- Natural sponge
- Clear spray lacquer
- Foam or styrofoam – old packaging material is perfect for this!
- Preserved Sheet Moss
- Cool temperature glue gun + glue sticks

The iron metallic surfacer is basically a paint made of ground up iron. Rather than just appearing metallic, it actually has the properties of the metal, like the ability to rust when you follow up with the corrosive rust antiquing solution!
Are you excited yet? You should be! This is crazy good, you guys!
Step One: Paint on the iron metallic surfacer and allow to dry for at least 24 hours.

Step Two: While wearing gloves, use the sea sponge to apply the rust antiquing solution. The rust won’t show up right away, so bear in mind that wherever the solution touches WILL rust to some degree. I wanted a mottled application, so I lightly sponged in some areas and then applied more solution in others. Allow to dry overnight.

Step Three: Apply 1-2 coats of clear spray lacquer to seal the rust – this prevents any rust transfer/stains when you handle your finished project! It will tone down the bright orange of the rust slightly, but I personally love the darker effect.

Step Four: Cut down old foam or styrofoam to fill the inside of the letter. I pressed the letter into the surface of an old styrofoam cooler and then used a steak knife to cut out along the lines! Then, I just squeezed the foam inside the metal letter. It was a nice tight fit, so no glue was necessary!

Step Five: Gently separate the preserved sheet moss into workable sections and glue it onto the foam inside the letter with the cool glue gun (the cool temperature will help avoid melting the foam). The nice thing about working on the foam is that you can always pop it out of the letter one day if you decide you want to do something different!
Once all the foam is covered, it’s time to display your beautiful rusted & mossy monogram!


Isn’t the rusted patina fantastic?

I was having so much fun with this whole process of corrosion that I decided why not run with it for the coasters as well? You don’t necessarily notice the rusted finish on the letter unless you’re looking at it very closely, so I thought the coasters would be a great way to showcase my new favorite texture.
DIY Antique Rust Patina Coasters

The process for creating the coasters was nearly identical to the process I used for the letter above, however this time I really focused on the rust antiquing solution and allowed it to puddle and pool to achieve a more dramatic effect! Again, I sealed with two coats of clear spray lacquer to make sure they would hold up to use and to prevent any transfer of the rust.
I absolutely adore the way they turned out!


Have you ever used a reactive metallic paint before? It’s so much fun! I’m already looking around for more things to rust, which is kind of hilarious because I typically steer away from rusty/rustic decorative elements. I guess I’ve been set straight – even rust can be glamorous!
![]()


Remember, you’ll head over to Two Thirty Five Designs next, but here’s the full list of Swap It Like It’s Hot participants!
Tune in all week to see the crazy items this talented group of bloggers has been making over! Search the hashtag #swapitlikeitshot on social media to follow along with all the fun or check out our Pinterest Board.
MONDAY
That’s My Letter | DIY On the Cheap | Run To Radiance | The Gathered Home
Two Thirty Five Designs | Chaotically Creative | Decor Adventures | Homemade By Carmona
TUESDAY
Thoughts From Alice | Reinvented | Confessions Of A Serial Do-It-Yourselfer
Restoration Redoux | Always Never Done | I Am a Homemaker
| Windgate Lane
WEDNESDAY
Town and Country Living | brepurposed | The Charming Farmer | 58 Water Street
Designer Trapped In A Lawyer’s Body | Year of Serendipity
White House Black Shutters | Desert Domicile
THURSDAY
Two Purple Couches | Like A Saturday | Finding Silver Pennies
Artsy Chicks Rule | Something to Be Found | Shades of Blue Interiors
Simple Designing | Our Southern Home
FRIDAY
Evey’s Creations | Dragonfly and Lilypads | Weekend Craft | Ciburbanity
A Designer At Home | Polished Habitat | Blue i Style | Addicted 2 DIY
love that moss letter! so fun! and the antiqued metal, of course!
Thanks Cassie! It’s so funny that I finished these right before the Amy Howard workshop and the zinc demonstration – now I need to add some zinc to the mix as well!
What a fun swap. I really like how you gave the “B” an antique rust patina. And your photos are styled beautifully.
Thank you so much Marci! The rust patina is such a fun trick to have up my sleeve now – so many possibilities!
bryyyyyne.
this is awesome! I absolutely love it!
Thanks so much Allison!
Love this so much! Now I want to rust all the things!
Thanks so much Bee! It’s too easy and fun!
I mean… I shouldn’t be surprised, but this is amazing. That rust patina is genius! Thanks for being such an awesome member of the #swap brigade!! xx
Aw, thanks Charlotte! Thank you for all the work you do to organize it – I’m always so thrilled to be included! 🙂
Brynne such a magnificent transformation and really only using paint. I’ve never tried reactive metallic paint but now you’ve got me thinking I must! Beautifully put together.
Thanks so much Jaime! My “transformation” felt like cheating a little after I saw what you were able to do with your thrift supplies!
Wow, such cool makeovers!!
Thank you Christy!
Love this idea! I want to rust some planters we have but I think I’d need 30 of those little bottles haha
Oh, that would be so cool! I know – the bottles are pretty tiny. Although I did find the coverage to be pretty fantastic with just one coat!
I absolutely love these makeovers, Brynne! I’ve never heard of this type of paint before, but—Wow!!! I’ve gotta try this out sometime! I love the effect you achieved on the coasters – they’re beautiful! I also love your book collection 🙂
Thank you so much, Emily! I wouldn’t have thought the coasters would become my favorite part, but they really are! My book collection is dear to my heart – I actually have a post going up tomorrow morning on decoration with vintage and antique books!
Moss + Brass is kind of a match made in heaven! Love the pretty pieces, they turned out marvelously!
Thanks girl! It was a fun challenge!
Brynne! I love it! 🙂 Great job girl! That B was so made for you and you seriously upgraded those coasters. Feel free to sprinkle rose petals where needed for a touch of romance. 😛
You found the most perfect things to send to me! I still can’t get over the B! And I think the coasters might have even become my favorite part… Thanks Tania!
LOVE it! I’ve never used a rusting agent before, I’ going to have to try that one out! 🙂
It’s so cool! Definitely a fun DIY technique to have in your back pocket!
Wow, what a neat process! Love what you did with your swaps!
Nancy
Thank you so much, Nancy!
Such great makeovers! I’ve never used a rusting agent before. I’m going to have to try it out!
Thank you Shanna! The rusting agent is so cool – definitely give it a try sometime!
I love everything about these pieces. The B and the coasters now belong together and look like you paid top dollar from some fancy store. LOVE!
Thank you so much, Jillian! 😀
LOVE your project! That moss letter is so pretty and I just adore your vintage books and the way you framed the letter with them. Very pretty!
I learned something today! That rust activator is amazing, and I LOVE the mossy letter. AND the coasters. AND the photos you took of them. 🙂
Aw, thank you so much Kimm!
I love the moss letter! I need more moss in my life, I think 🙂
Who doesn’t, right?! Moss forever! I have some leftover that needs a new purpose in life…
Never used a reactive metal paint. It looks great
Thanks Julia! You should try it sometime – it’s so cool!
I’m smitten with how lovely this is! Such a classy and moody vignette you created! Well done!
Thank you so much, Rachel!
Love this, Brynne!
I have lots of questions.
1. Does that stuff work on wood?!
2. I think I remember you having some post office box fronts but now I see them on a cabinet – did I miss something?! Did you fit those doors onto a file cabinet?! I have a few of those and have been wanting to that but it seems super hard so… they’re in a drawer.
Okay, only 2 questions… 🙂
1. Yes, the iron base coat should be fine on wood. I would prime first so you don’t waste any getting soaked into the wood.
2. I found two post office boxes – one with little doors and one with drawers. This is the one with drawers that sits in my entryway to hold shoes. I wonder if you could do something like this DIY card catalog cabinet from Decor and the Dog, where it’s not actually a ton of little doors, it just looks like it… That could be so cool!
That has to be the coolest paint of life! Love how the pieces turned out after their makeover.
I love this! This totally looks like something you’d find at Anthropologie. Now I want to find a metal letter to make one!
Brynne! I love what you did. I might come over and just steal that B from you. Great rust technique. Definitely keeping that in my back pocket! Great job.