Today’s post and tutorial is sponsored by Mohawk Consumer Products and may contain affiliate links. Thank you for supporting the companies that help me continue to create great content here on The Gathered Home!
Hello you guys! I’m so excited to bring you this project today!
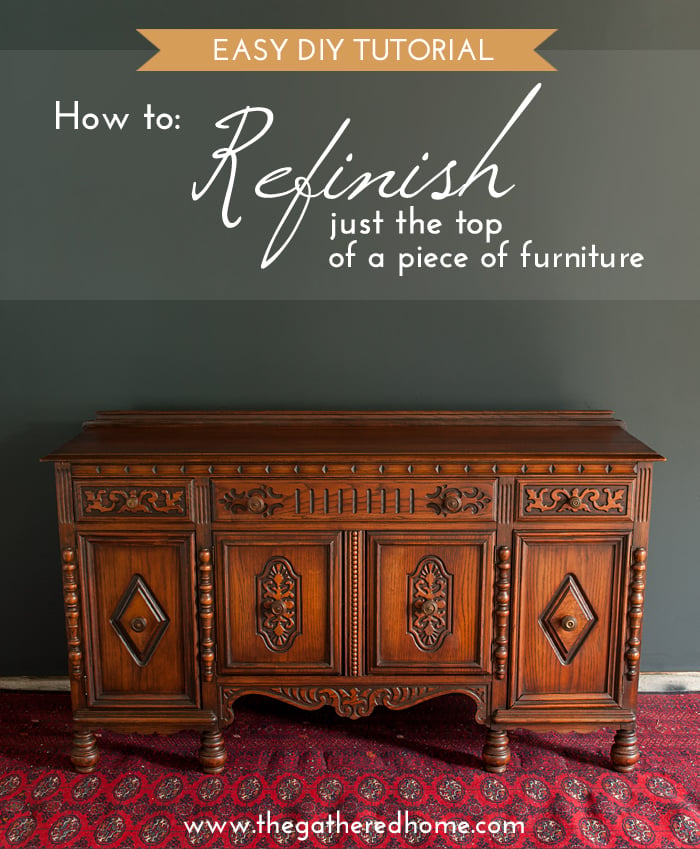
This 1920’s solid oak sideboard was a Craigslist find towards the beginning of the summer. I was absolutely smitten with its gorgeous carvings, but it sat untouched in the garage for several months thanks to some water damage and finish issues on the top that my usual methods weren’t able to solve.

When I brought the sideboard home and realized the top was going to need a little more work than anticipated, the first thing I did was sand down the old finish.
And then it sat. For a few months. As most projects do when I’m a little nervous to proceed.
So when Mohawk contacted me about trying out some of their wood finishing products, I had this sideboard in mind as the perfect candidate!
The body of the sideboard was in great condition and the original finish was still going strong, so I decided to tackle refinishing just the top. Since I buy a lot of furniture on Craigslist, this is an issue that I see again and again – and I’m excited to share that yes, it really is quite easy to refinish just the top of a piece of furniture and completely revitalize it!
Mohawk has been around since 1948 and their wood finishing, touch up and repair products are well-known to woodworking professionals. I’m a complete woodworking newbie, so I relied on the Mohawk team to point me in the right direction as to which products (and colors) I should use for this project – and they totally nailed it! The top and the body of the sideboard are a perfect match!

Want to get your hands on your own Mohawk products for your next project? You can find some of them right here in the Mohawk Consumer Amazon store, and the rest will be added soon!

Wiping Wood Stain
Since I was starting with an already sanded surface, step one in this refinishing project was the Wiping Wood stain in “Medium Walnut.” I applied it with a disposable brush and then wiped it off with a clean rag as per the instructions on the can.

With one easy coat, I was left with an awesome base color that closely matched the lightest portions of the sideboard’s body, undertones and all!

Finisher’s Glaze
After allowing the stain to dry overnight, I followed up with the Finisher’s Glaze in “Van Dyke Brown” to match the darker portion of the sideboard’s coloring.
I applied it liberally with a brush, waited a few minutes, then very gently followed up with a clean rag, wiping in the direction of the wood grain.

The goal was to leave just enough of the glaze sitting on top of the stain to tint it slightly and add some variation between lighter and darker tones.

Finisher’s Choice Clear Lacquer
Finally, the back of the glaze can recommended topcoating within 6 hours of application, so I applied a light coat of the Finisher’s Choice clear lacquer and allowed it to dry.
This began a series of light coats of lacquer (multiple thin coats are recommended), followed by extra-fine steel wool once dry to achieve a smooth and durable finish.

Finally, I finished it off with a some paste wax that I already had for a handrubbed finish that doesn’t look too shiny and new and blends perfectly with the rest of this 90-something year old piece!
The Finished Project
This turned out even better than I had hoped! I’ll admit, I was nervous to get started, but once I dove in, I was surprised at how easy the transformation really was!


I’m very, very tempted to hang onto this gorgeous piece for my dining room. The more time I spend with a piece of furniture, the more I “bond” with it. But at the very least, I’m so glad to have been able to give this heirloom-quality vintage treasure a new lease on life. Here’s to the next 90 years!
![]()


Did you find today’s post helpful? I’d love for you to share it on Pinterest!

it looks so beautiful!
Thank you Cassie!!!
Great transformation! Love the idea to just tackle the top. Makes everything so much more manageable!
Yes, absolutely! I’m so glad I was able to get such a great match with the rest of the sideboard – refinishing those carved details would be no joke!
oh, wow–it looks perfect now! And I definitely understand why you’re tempted to keep it–it’s so pretty!
Thank you Gretchen! I’m really wishing I had the perfect place for it… While I love the clean lines of mid-century and more modern furniture, I’m also a sucker for a good carved detail!!!
Love how it turned out! My favorite part is feeling the smoothness when done. Great work!
Oh yes! That’s such a great feeling! Thank you Nicole!
It’s gorgeous!! I love that you were able to fix it perfectly and keep it in its beautiful wood state!!
Thank you Amber! Me too! I’m sure this piece could also look amazing in a painted finish, but I’m so glad I could rescue the original gorgeous oak!
This is an amazing tutorial. Your sideboard is absolutely gorgeous. And I especially love your safety message!!! Great job.
Thank you Marci! I had a little fun with that safety message… I can’t help the Star Wars references whenever I wear my respirator 🙂
This turned out beautiful! Love the PSA by the way!
Thank you sweet lady! I had too much fun with that PSA 🙂
So glad you were able to salvage the top. Definitely brings it back to its former glory!
Me too! It’s such a great feeling to “save” a piece like this one!
I wouldn’t have imagined it be that easy. (Not that the labor wasn’t hard, but matching the colors I mean). It’s super beautiful!
I had definitely psyched myself up with fears about it, but I was amazed at how painless it really was! Major kudos to the Mohawk team for the color recommendations!
What a difference. Super job
UM. OBSESSED. Are you selling it??? I want!!! You did an amazing job, it’s really gorgeous!! Seriously, let me know if you decide to sell. 😛
Aw, thanks girl! Selling it is the plan but I haven’t taken any steps to list it yet… You can have first dibs!
YAY. 🙂
Love it. It’s gorgeous! It’s one of those pieces that Nicole… The Rehab Addict, would have had a fit to paint! I’m glad to hear about the Mohawk products as well as the steps you undertook. Inspiring
Thanks Deanne! It would break my heart to see this painted – it’s just so neat as-is!
Great job, B! Looks amazing! Hope you make a pretty penny on it!
Thanks so much, Dena!