I debated over whether or not to share this tutorial since it’s a bit of a departure from the usual projects you’ll find here on The Gathered Home. But a little change up is good every now and then, right? And I’m always glad to get to share a side of myself you might not have seen before!
If awesome video-game-themed crafts (plus cupcakes!) aren’t your thing, never fear – I have a furniture makeover tutorial coming at you soon, so stay tuned! If, on the other hand, you happen to be a DIY and Legend of Zelda-lovin’ reader… Well, you’re in luck – worlds are colliding today!

I don’t think I’ve mentioned this here on the blog before, but my husband Bryan, on top of his day job, is a composer for video games. (Which is pretty cool, if you ask me!) When he told me that a local game developer meet-up was having a potluck of sorts, I couldn’t help but go a little overboard in brainstorming what to bring…
An iconic treasure chest from the Legend of Zelda video game series, filled with cupcakes topped with the game’s iconic rupees, and, of course, rigged to play the game’s signature treasure chest sound when opened!
Because what could be cooler than having your wife send you off to a business event with cupcakes + a craft, right?! (For the record, it was a pretty big hit and was requested for future meet-ups!)
Now, you might not have the exact same circumstances which necessitate such a prop, but I think this would be a fantastic piece for a birthday party or to distribute candy at the door to trick or treaters! You could always use a different sound effect as well to adapt the theme to your purposes…

*Today’s post may contain affiliate links. If you make a purchase through an affiliate link, I may receive a small commission. You can read my full disclosure here. I hope you all know by now that I do only share things I really truly love!
You Will Need:
- Unfinished wooden treasure chest, approximately 13″ long x 10″ wide x 10″ high – I found mine at Hobby Lobby and used a 40% off coupon.
- Fine-grit sandpaper
- Black craft foam sheet, approximately 12″ x 18″
- Brown acrylic craft paint
- Yellow cardstock
- Double-sided tape
- Hot glue gun
- Recordable greeting card*
* The extra-awesome finishing touch, although totally optional. I actually had a bit of a hard time tracking down an empty recordable card, but managed to snag the last one at a local Hallmark store. If you can’t locate a card, you might consider a sound module for greeting cards like this one.
Step 1
If your chest has metal studs and accents like mine, start by gently prying them off with a metal scraper or another thin metal tool. You’re going to reapply them later, so try not to bend them too much.

Step 2
Give the wooden treasure chest a quick once-over with the sandpaper to get rid of any splinters and knock down any rough patches.

Step 3
Add a dab of brown acrylic paint to a small container and add approximately the same amount of water to thin it out. Use the watered down paint to stain the wooden chest. After it dries, you can do another coat or two until you’re happy with the color.
(I chose to use acrylic paint instead of stain since I was going to be using this chest around food and didn’t want any lingering stain fumes. Watering the paint down still allows the wood grain to show through.)

Step 4
Cut two long 1″ thick strips from the black foam.

Use the hot glue to attach them around the back side and top of the treasure chest, then use a separate piece on the front so the chest can still open and close.

Step 5
Reattach the metal accent pieces and studs, gently hammering them back into place through the black foam strips.

Step 6
Record your sound effect on the recordable card! We found a Zelda treasure chest opening sound effect online and recorded the card by holding it close to the computer speakers. The sound quality isn’t fantastic, but it gets the point across!
Once you’ve recorded the card, gentle pull it open and cut it apart, being careful not to snip any wires. There’s a pull tab that activates the card when it’s opened, so left it attached to a long strip of the card…

Step 7
Line the inside surfaces of the box with yellow cardstock, cut to size and attached with double-sided tape, but stop when you get to the back of the box…

Use a few dots of hot glue to attach the back of the greeting card to the back panel of the box, with the pull tab facing up.
You’ll probably need to play around with tab a little, adding a few folds, etc., so that it activates when you open the box, but closing the box resets it. Attach the tab to the top of the box with another dab of hot glue.
Then, you can add the final pieces of yellow cardstock to hide the card and tab. I left my back yellow cardstock piece a little loose on top so the sound wouldn’t get too muffled.

Step 8
Made it this far?! Well guess what… you’re just about done!
The final step is to fill with treats of your choice and entice someone to open the box…
Da-na-na-nahhhh!

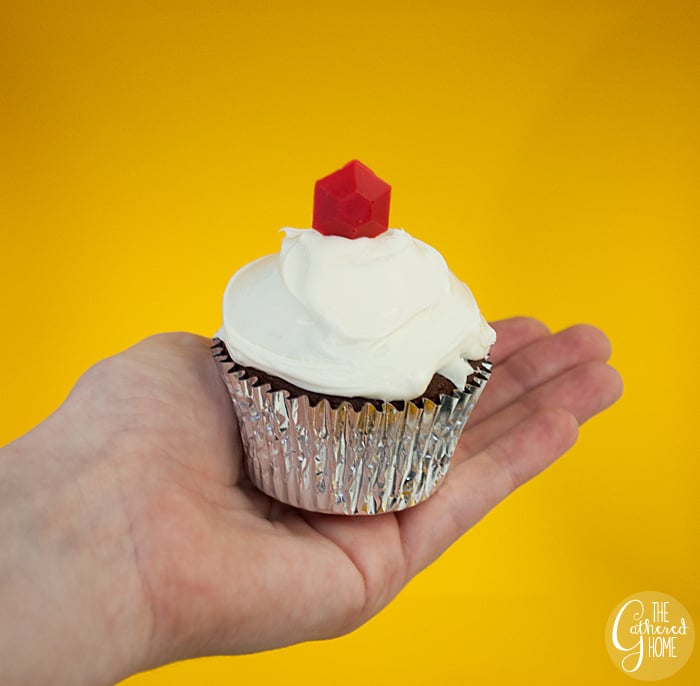
I found a break-apart hexagon candy mold and used red, green and blue candy melts to create Legend of Zelda “rupees” to top some basic cupcakes. Pushed slightly into the icing, they are close enough replicas for me!

Don’t forget to leave a not-so-subtle “Open Me!” sign in front of your treasure chest so people know they can interact with it… (Ask me how I know that’s important!)
Well, I hope you enjoyed today’s craft tutorial! I had way too much fun creating it!
![]()


Oh my gosh that is so so cute and awesome! I actually used to play Zelda for hours when we got married and before we had kids. Love all the little added details too.
I would have never thought to use a record-able card to make sound effects like that. Pure Genius Brynne!
Those cupcakes look delicious!
Brilliant! I had two boys reading over my shoulder and murmuring approvingly while I read this. Gus played a song from Zelda at his piano recital last year 🙂
I’m not sure what anything Zelda looks like, but gushers are a similar shape and are one of my favorite candies *yum!* this is wildly creative and I love it!
Oh my god you’re a genius!! My ex used to LOVE Zelda and so listening to that sound brought back memories (not sure if that’s good or bad lol) 😉 This is so stinkin’ clever though – no wonder it was a hit! xx