Hey you guys! I’m so excited about this project today!
A few weeks ago, I had never considered delving into the world of yarns, rug hooking, and weaving, but now I’m definitely becoming addicted. This is my second DIY wall hanging and I don’t think it will be my last!

I’m not going to lie: this is a fairly involved and time-intensive DIY, but you may find yourself just as hooked (oh what a wicked pun!) as I did if you try it!
If you feel inspired to recreate my design step by step (for personal use of course), please feel free! But the beauty of this craft is how infinitely imaginative you can be – change colors, change textures, change shapes, and suddenly you have a whole new work of art.
Step 1: Make a design plan.
I collected yarn from a few craft store visits and raided my secret stash, choosing colors that I thought would complement each other and work well in my home.

Then, I created a blank canvas in my photo editing program and began to doodle using the various yarn colors I had selected. I used Photoshop Elements, but seriously – you don’t need anything more involved than Paint for this, and you could do the same with a piece of paper and some markers. Try out different shapes, color arrangements, and combinations until you settle on a design you are happy with.

Step 2: Prepare the backing for your wall hanging.

Many wall hangings are made by weaving, but I decided to make mine on a rug canvas backing and using latch hooking techniques. (Although now I want to try weaving one next!).

*Amazon affiliate links if you, like me, don’t like leaving the couch for your crafting supplies.
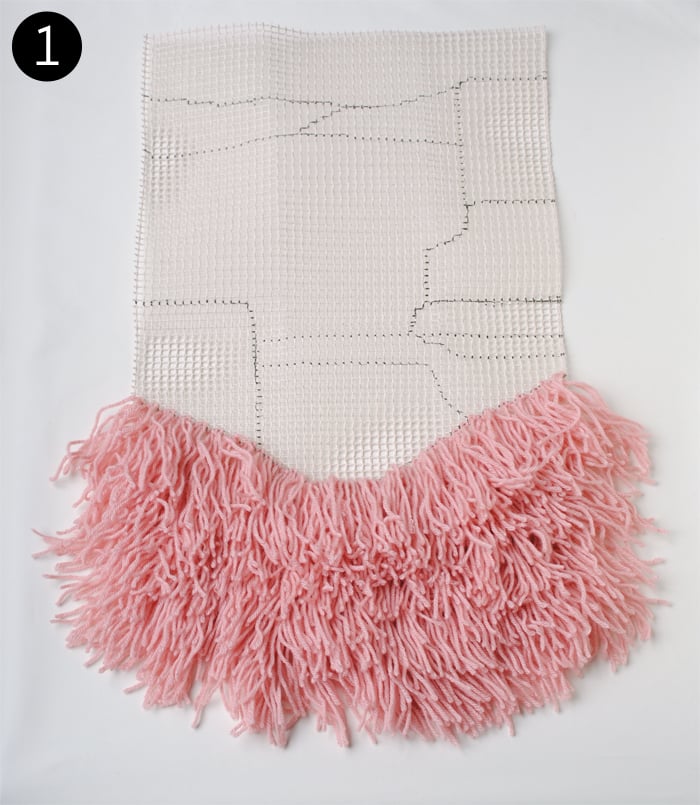
Decide on your dimensions and cut the canvas. I made mine 24” by 15”.

Then I followed my little Photoshop design plan and used a sharpie to roughly copy the design onto the canvas. It does not have to be perfect – angled lines will end up being “pixelated” by the rug canvas grid, so just go for it! Your sharpie lines will be covered with yarn later.

I decided I wanted an angled bottom to my wall hanging, so I trimmed away some of the canvas into a V-shape.
Note: I actually ended up altering the bottom even further once I finished the wall hanging… So seriously – there is no “wrong” way to do this!

Step 3: Begin hooking your wall hanging!
I vaguely remembered how to latch hook from a kit my grandmother gave me when I was a child, but I did need to Google for reminders. So I’m going to point you to several helpful tutorials today. I used several different techniques on my wall hanging (Can you spot them below?): (1) latch hooking (the long loose pieces: pink, mint, beige, gold); (2) regular rug hooking (the looped brown & cream sections); (3) crochet (the flatter sections: mint, red, gold, and black is hiding under the tassels).
I also threw some tassels on there for good measure. Because who doesn’t love tassels?

This is definitely a time-intensive project and the rows come together SO. SLOWLY. But once I got into a nice rhythm I found myself really enjoying the process! I’ve broken it down step by step for you below, never fear…
Layer 1: Pink 10” pieces. Latch hooking technique. (Latch hooking works best from the bottom up. Ask me how I know!)
I cut my pink yarn into 10” pieces using this handy trick:

Make a cardboard template that is the height you want your yarn piece to be and as wide as you like. Wind your yarn around it, and then cut along both ends with scissors. Voila! Many many pieces of correctly sized yarn!
For my pink section, I didn’t want my yarn to be too closely packed so I skipped several rows as I went up.
As you can see, I filled in anywhere I felt needed a little more bulk:

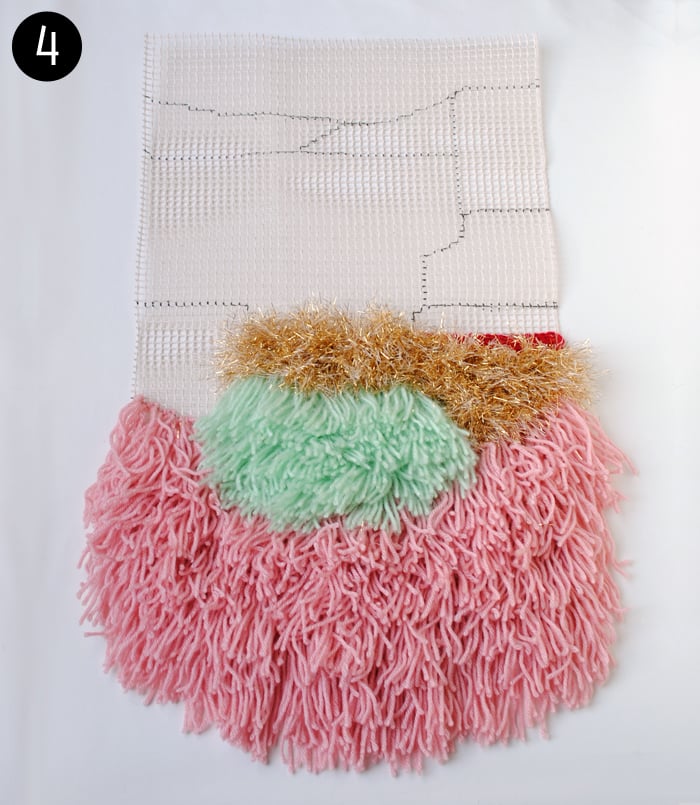
Layer 2: Mint 8” pieces. Latch hooking. I skipped every other row or so for this one as well.

Layer 3. Gold 4” pieces. Latch hooking. I skipped every other row on the canvas.
Do you know how they call glitter the “herpes” of craft supplies? Well, I submit a new contender. This gold eyelash yarn is ridiculous. It gets everywhere and I mean everywhere.
But it’s so pretty and sparkly.

Layer 4: Red yarn. Crochet. I don’t know if this is an actual wall hanging technique or not – I was just experimenting and really liked the effect! I did a simple crochet chain stitch on top of the rug canvas. You don’t cut your yarn for this section. You are basically treating the rug canvas like a chain of crochet and single crocheting on top of it.
You can barely see this little layer in there – look closely!
Layer 5: Mint yarn. Crochet.

Layer 6: Chunky cream yarn. “Traditional” rug hooking technique – which I’ll refer to as “looping” to keep it separated from “latch hooking”.
For this technique, you don’t cut your yarn into small pieces. You start by creating a loop at one end of your bottom row, then you guide the yarn along the underside of your row pulling up loops through each square in the rug canvas.
Be careful not to accidentally unravel your whole row… It may or may not have happened to me. But as you fill up the squares, the yarn will bunch together and start to support the loops.

Layer 7: Black yarn. Crochet. If this looks different to you than the finished product up top, you aren’t crazy. I decided to fill in the black section with my crochet stitch first so the tassels would have a background behind them.

Layer 8: Beige 4” pieces. Latch hooking. I skipped every other row on the canvas.

Layer 9: Black yarn. Crochet. After I crocheted the background, I got to work making my tassels! I used 5 for each black section of my wall hanging.
Don’t know how to make tassels? I used my yarn winding template again to cut 10” pieces of black yarn, folded a bunch in half, and wound another piece of yarn around the top to create a tassel. Visual tutorial here.

Layer 10: Gold yarn. Crochet. I liked working with the gold yarn much better when it wasn’t cut into little pieces!

Step 11: Red yard. Crochet. You know the drill: rinse and repeat.

Step 12: Chunky brown yarn. Looping.

Are you still with me?
That was intense!
But if you’ve made it this far…
Step 4: Finish the wall hanging with a dowel up top! I purchased a thin wooden dowel at the craft store for 60 cents and painted it with some leftover gold acrylic paint. I strung a length of my brown yarn through one of those big plastic needles for plastic-canvas and stitched the wall hanging to the dowel by wrapping my yarn around the dowel and through the top layer of the wall hanging. Then I braided three pieces together for my hanger on top.
Step 5: Hang that baby proudly on the wall!


What do you think? Are you inspired to go on a yarn shopping spree and tackle a DIY wall hanging of your own? Please share with me if you do – I’d love to see it!

Looks even better than the first one you made 🙂 Perfect for that space and I love the chair too 🙂 xoxo
Thank you Kristin 🙂 That chair is one of my favorite recent Craigslist finds for sure!
oh i agree- love this one so much more- love the colors and the splash of pink! looks SO good in that corner with the pillow!
Yay! Thank you Cassie 🙂
Love it Brynne! Beautiful colors and I really love the modern granny-chic vibe. Granny-chic is probably exactly what you were hoping people would think, right?! 😉
I am all for granny chic! I mean, it's hard to get much more granny than a yarn wall hanging. And you even threw "modern" in there, so overall I'm very pleased with your assessment. 🙂
O love it sooooo much! I want to make one but I fear I lack the commitment…
Even though it does take quite a bit of commitment, I really enjoyed my hours spent crafting and watching Netflix. I think it was exactly the sort of semi-mindless craft that I needed to help myself relax and unwind this month!
Oh wow- so neat! I love how it came out. 🙂 This might be a "winter blizzard" project for me, because we tend to be trapped for a few days when it snows.
Thank you! Yes, this would be the perfect project for that – some tv shows, hot chocolate… So fun!
WOW!!! This is so awesome and once I saw it transferred to the gray wall… WOW!!! It really pops. I love the arrow pattern at the bottom accentuated by the pink. Love your mix of colors. This is truly a piece of art!!! Love it!!
Aw, thank you Katja! I wasn't crazy in love with it until I moved it to the gray wall – it belongs there!
This is uh.maz.ing!!!!! Seriously, I agree with Kristin, I think it's a million times better than the first! I love the different types of technique you used!
Thank you Jenn! That's so sweet – I like this one so much better too! 🙂
So so so so cool, Brynne. It is the most perfect thing you could have put up on that wall. Looks amazing!!
Thank you Amy! 🙂 🙂 🙂
whoa! that's amazing! and it's huge….I can definitely tell how much work you put into it. great job!
Haha, so much work! Thank you Gretchen!
Awesome work!! And looks so great on the wall with that pillow nearby!
Thank you Amy! That pillow is my home decor muse – I love the colors so much!
I've shared this all over the place. I'm hoping I work up a bit of time to create one for myself. The texture is on point and the whole piece is very cool! <3
Thank you Corinna – I appreciate the sharing so much! Hugs! I do hope you'll make one – this is right up your alley! 🙂
This is so lovely! That gold yarn really adds something special to the piece.
Thank you Jennifer! I guess it was worth all the shedding woes 😉
Looks fantastic! Even better than the last! Do you have any problems with the canvas backing pinching together? I did a rag rug and I had a hard time with the canvas backing getting wavy. I think I was pulling too tight.
Thank you Emily! I didn't have any trouble with pinching or pulling – maybe what I used was more of an open weave?
Love how it turned out Brynne! Just beautiful!
Thank you Ashley! <3
Brynne, I LOOOOOOOVE this! Oh my goodness it's so much fun and I never would have thought to mix all of those different colors. Pinning all over the place and thanks for sharing it at The Makers!
Thank you Katie! Pins = crack to me, so I'm eternally appreciative! 😉
Cool wall hanging! I may have to give this a try. I love finding different things to do with my massive yarn stash other than crocheting.
Navy Wifey Peters @ The Submarine Sunday Link Party!
A massive yarn stash would be PERFECT for this project… I'm kind of envious and would love to come raid it 🙂
Whoa Brynne, that looks amazing! I really want to do something like this only weaving seems way too intensive and time-consuming. I'll definitely be trying this method!
Thank you Anna! I want to try a woven wall hanging next. It does intimidate me a little! Latch hooking is such an easy process – I love it!
What a great tutorial! You are making me want to give it a try!
Thanks Alexis! I hope you will try it and send me pictures!!!
This tutorial rocks. And the finished product is so fun and unique. Awesome job.
Thank you so much Kim! <3
Amazing – looks so lovely in your home! Pinning this for sure!
Thank you Emma – I appreciate the pin so much! 🙂
How exactly did you do the crocheting part? I just love your wall hanging! This will be my next project for sure!
Hi Judy! I wish I had a more helpful answer about the crocheting section, but it was something I just stumbled upon by playing around on the canvas… Basically, think of the squares of the canvas backing as a row of chain stitches and then single crochet on top pulling loops from underneath each time to anchor the crocheting on the rug canvas. I hope this helps!
So glad you're going to make one!
I am so stinking impressed. I started a shag rug a year ago. And I stoppedhalfway. It took me a month just to get that far. I know how long this takes. It turned out amazing. I love your pattern and colors.
Jenni
Thank you Jenni! I discovered that I really enjoy the process and having something to keep my hands busy while I'm watching Netflix or a movie – in general I have a hard time sitting still, so this gave me something to do during my "down time". 🙂
love it and totally awesome tute! love the gif!
Yay! I'm so glad you love the gift – it's my favorite part! 🙂
WHAT THE WHAT. This is freaking amazeballs. I have no idea how to loop/stitch/crosshatch/skiptotheloo at all so ya know, I'm going to admire your awesome skillz from afar. But seriously, that is impressive. You should totally sell them 😉 xxx
Haha, thanks Kimberly! 🙂
I LOVE This!, oh how I wish I hadve kept my childhood favorite wall hangings though. Now I gotta go find these hanging rug canvas sheets! Perfectly do-able and pin-able 😀
Yay! I hope you're inspired to make one 🙂 Thanks Jeanine!
Brynne!! This is awesome!! Love it love it love it!! Love the colours and the textures!! I've been wanting to do some weaving for some time, but think I'm going to try my hand at this first now!! Pinning and sharing!! xxx June
Thank you June! I definitely still want to try weaving, but I've already started my second hooked wall hanging 🙂 Thank you for sharing!
This is AHHHMAZING Brynne! LOVE the different colours and depths! I can't wait to share it with my favorite things this Friday morning! Enjoy the rest of your week!
Thank you so much! I can't wait to see the post on Friday 🙂
Goodness gracious it's even better than the first. You are a monster talent. Monster!!!!!!
Aw, thank you Amber!!!
Very pretty, I love it. You did a great job!
Thank you so much Terri!
I love the wall hanging and have started it but do not understand the crochet section I have tried everything. What am I missing. What do you mean by laying the chain on top of mesh Any help you can offer will be appreciated. Your hanging is just beautiful.
Thank you
Hi Judi – so glad you are making your own wall hanging! I’m sorry the crochet section is a little confusing – I kind of made it up as I went along and I wasn’t completely sure of the crochet terminology. Basically, I treated the canvas backing as if it was a foundation chain and then did a slip stitch on top of it. So the hook went through each hole of the canvas backing and attached the crochet stitching to it. I hope this helps!
Thank you so much. Will give it a try. Hope to send you a picture soon. Enjoying your site.
Can you give a quick tid bit about how you did the crochet portion and the white knot portion?
Hi Veronica – sorry those two steps are a little confusing! For the crochet portion, I basically treated the canvas backing as if it was a crochet chain and then did a slip stitch on top of it. For the white knot portion, I think you mean layer 6… This YouTube video is helpful for that step. I hope this helps!
I love this, congrats! The colors are amazing. Unfortunately I have no talent of my own, but I will try to convince my grandmother to make one for me 🙂
Hi, was doing a search on weaving on rug canvas, when I found yours. I’m in the midst of a free form version, trying all different techniques and materials. So I’m not the first one to do crochet on rug canvas, lol. Mine so far has crochet, locker hooking, & latch hook. Looking for more ideas, loved your tutorial. Thanks!