Let’s talk bugs… Creepy crawlies or classic design elements?
I may loathe live encounters with insects, but there’s just something mesmerizing about getting an up-close look at their crazy shapes and details! So alien, so awesome.
Who remembers these Vintage Beetle Print Pillows I designed? I am still absolutely crazy about them!

So obviously, I’m in favor of using insects to decorate my home! Today’s project is a fun wall decor idea I’ve had bouncing around in my head for months. I’m so glad I finally decided to take an afternoon and bring it to life!
DIY Gilded Insect Faux Taxidermy
Giant plastic insects + liquid gold leaf + wooden plaques = the coolest, glammest, modern insect art you ever did see!

I even had most of the supplies on hand and only needed to make a quick stop at the craft store for a few things.

*Today’s post may contain affiliate links. If you make a purchase through an affiliate link, I may receive a small commission. You can read my full disclosure here. I hope you all know by now that I do only share things I really truly love!
You Will Need:
- Wooden plaques – various sizes/shapes, totally up to you! (Amazon, Walmart)
- I used: a 10″x7″ oval, a 7″x5″ oval, and a 7″ diameter round plaque.
- Fine grit sandpaper (Amazon, Walmart)
- Large plastic insects – these are the exact ones I used (Similar here)
- Paint color of your choice – I used some leftover paint I had, Clark+Kensington “Black Chiffon”
- Liquid gold leaf (Amazon, Walmart) Heads up, you will need mineral spirits (Amazon, Walmart) to clean your brush afterwards
- Spray Sealer – I used Rustoleum clear lacquer spray
- Hot glue gun (Amazon, Walmart)
- Command hanging strips (Amazon, Walmart)
Step One
Lightly sand the wooden plaques and paint them with your chosen paint color. Allow to dry.

Step Two
Apply the liquid gold leaf to the plastic insects and allow to dry. Warning: don’t apply any liquid gold leaf to the bottom of the insects, or the hot glue won’t hold.


Seriously, these gilded insects are pretty sweet decorative objects on their own. You could always just call it a day right here and scatter them throughout your home – I know I was tempted!

NOTE: Sometimes, the solvents in certain kinds of paint don’t react well to a plastic base, so you might need to seal your gold-leafed bugs with a clear coat. I used a can of spray lacquer I had in the garage and gave my bugs a good coating to seal them.
Step Three
Hot glue the gilded insects to the wooden plaques. Attach command strips to the backs of the plaques and hang!

Seriously, this was such a quick and easy project – I spent the most time just waiting for the paint to dry!
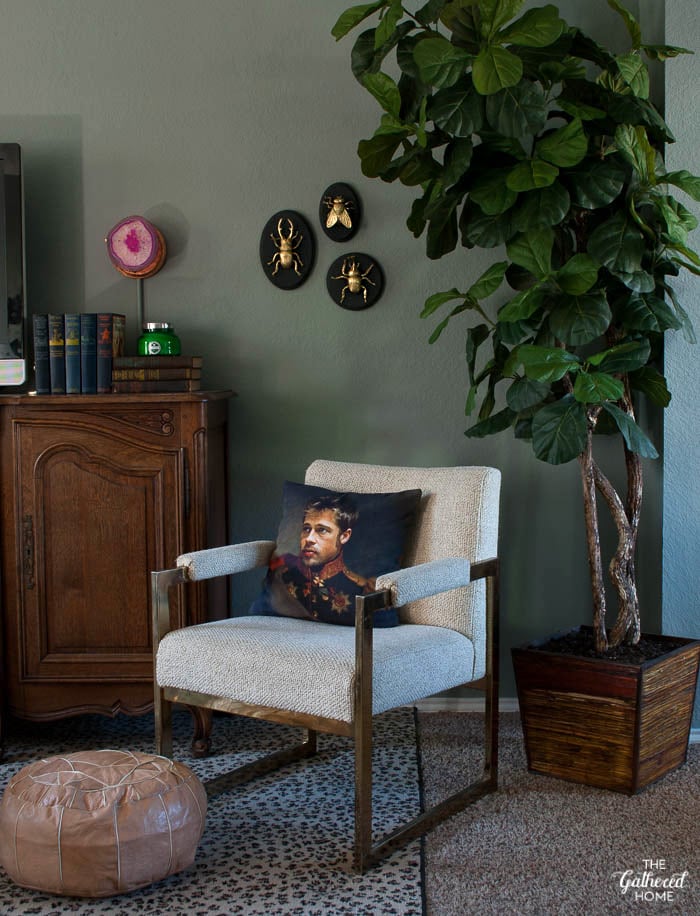
I absolutely love the way the gold insects pop off the deep charcoal background!

They are so dimensional and so much more interesting than a flat piece of art would be!


(And because it’s frequently asked – “Brad Pillow” is via Replaceface on Society6)
Pretty much the perfect craft, in my book! Fun, quick, easy, and eye-catching!
I love those! They look great!
those bugs are HUGE! and that looks amazing!
i can hear my grandsons squealing with delight over these, not something i would have ever thought of, so glad you did i love them xx
What a fabulous craft. I LOVE it!!
Your cleverness is killing me over here, Brynne! These are fantastic! I might be the minority, but I actually think they’re more handsome than the Brad Pitt pillow 😉
Totally need make one of these for my beetle loving friend.
Absolutely! That would be so sweet! 🙂
Great project! I’m totally doing this. And I love this room.
Oh yay! I hope you’ll share pics when you do! And thank you so much – the living room just might be my favorite room in the house now! 🙂
Brynne I love how you have showcased all these beautiful ways to incorporate entomology into decor. I’m not a big bug fan, but when it comes to decor, I can definitely be a fan of that!
Thank you Stephanie! I’m not warm and fuzzy towards bugs in any form or fashion except decor! 😉
those look so cool against your grey walls. I need to try liquid gold leaf, are the fumes strong. I always see it at Michael’s but I have yet to actually purchase it and try it out.
The fumes are pretty strong… I did it in the living room and then Bryan walked in and was like, “WHOA! You need to open some windows!” It’s a really pretty result though, so I guess I’m okay with risking a few brain cells. 😉
Where did you find the large bugs? I love the look. My grandson would go nuts over these in his room.
Hi Sherrie! I found a bag full of these bugs at Hobby Lobby, but you can also find the exact same ones on Amazon – I’ve included a link in the post.
All the best,
Brynne
Wow, what a great idea! I’m with Sarah: I think these bugs are far more handsome than the “Brad Pillow” – and a LOT more interesting! Thanks for the great instructions. I’m definitely going to make these!
LOVE this idea! I would love to do this same thing but with butterflies!
That sounds lovely! I hope you do and share pictures!
I was curious on the general sizing on the plaques. I see some on amazon but I don’t want to get some that are so big that they are off balance with the bugs. Can you specify a little more on that please? Thanks so much!
Yes! That would have been helpful to include, wouldn’t it? I’ll add it to the post!
The two oval plaques are 10″x7″ and 7″x5″, and the round plaque is 7″ in diameter.
I just stumbled across these on Pinterest and I absolutely love them! I’m a tiny bit of an entomology nerd (I think beetles are gorgeous!) and these look sooo classy! I can’t wait to make a set.
Thank you so much, Lisa! I’m so glad you enjoyed the post and I hope you’ll share pictures if you make your own!
I love bugs! I tried to find some locally but will order online. This is perfect for Halloween, although I’d keep them up anytime. This will be my fun Halloween arts and crafts project. PS: I really like how they pop on your wall with that paint color. Very inspiring.
I recently made these and love them- but the liquid gold leaf remains tacky and rubs off upon touching the insects, any ideas?
Hi Courtney!
So, this was a DIY project I made right before we packed everything up to move! I just dug these out of the box and realized that yes, mine were also a little tacky… Maybe something about the solvents in the liquid gold leaf not liking the plastic base?
Anyway, I wanted to make sure I had the right solution for you, so I grabbed some spray sealer (Rustoleum clear lacquer) I had in the garage and gave them a good coating. Once it dried, the tacky-ness was gone! I think any kind of clear sealer would work – they even make one especially for gold leaf, but I didn’t have any on hand. I’ll be adding that as a final step in this DIY project! Thanks for bringing it to my attention!
I used Krylon metallic spray paint in Brass. It worked great and seemed like it was much less time spraying it than painting with a brush. Hope it all works out for you!
PS- I’d share a picture but I don’t see that as an option here…
Thanks for the input, Sabrina! My comment system doesn’t have an option to share photos. But if you post it on Instagram, you can leave the link here or tag me, @the_gathered_home. I’d love to see!
I love this idea. My father in law is an entomologist and this is the perfect gift for him. Thank you!
Love this project, I’m a huge fan on bugs. Where did you find suxh big ones?
Thank you Deborah! I found these at Hobby Lobby actually, but I’ve found the exact same set on Amazon too – (affiliate link) Wild Republic 10 Piece Insect Bag.
I made these! Wish I could post a picture in here!
Thank you for this wonderful idea! I’m getting married and definitly am injecting some of my biologist background into the event. This inspired me to paint these guys gold and use them as part of my centerpieces! It’s difficult to make bugs look “classy” but I think I may just have found the answer. Hope my guests aren’t too offended!
Also, pro-tip– My bugs’ legs were all wonky when they arrived but I zapped each one with a hair dryer for about 30 seconds and was able to remold their antennae and legs to the correct positions!