This is fun.
I typically hop around from room to room in my house doing whatever current project strikes my fancy. It takes me months to add to various rooms. Nothing is finished yet.
However, I started this dining room project with an end-goal in mind and step by step ideas to accomplish that. So for once, I’m focusing on one project – start to [hopefully] finish. Having never decorated in this way before, it’s so fun to share each stage of the process with you guys – one layer at a time!
Last week was “Layer 1” – the new wall color and painted brick fireplace:

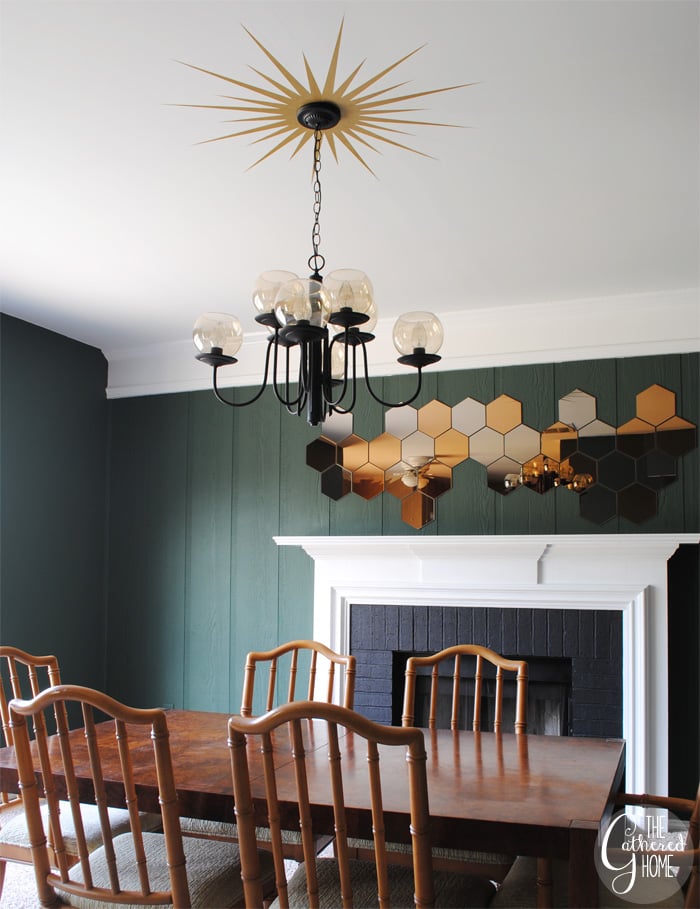
This week for “Layer 2” I painted a midcentury inspired sunburst ceiling medallion, hung my midcentury chandelier (courtesy of the former-dining room), and created a free-form mirror installation over the fireplace using Ikea honefoss mirrors.

You guys, I warn you – this is a picture heavy post. I just can’t get over what a huge difference these additions made and it makes me ridiculously excited to add more layers in here!


Are you ready for details? Oh, do I have details for you! Let’s start with the sunburst ceiling medallion…

You Will Need:
Contains affiliate links, in case, like me, you like to purchase your crafting supplies from the couch 🙂
- Scrap cardboard
- Protractor* (Amazon, Walmart)
- Pencil
- Straight edge (Amazon, Walmart)
- Painter’s tape (Amazon, Walmart)
- Gold craft paint (Amazon, Walmart)
- Small craft paintbrush(es)
- Heating pad, copious amounts of ibuprofen
This is a project that requires math. Geometry is haunting me. Basically, you need to know the diameter of your light fixture cap (in my case/most cases – 5”) and create a cardboard template.
I cut out a 5” diameter circle and then drew 24 equally spaced tick marks for the arms of the starburst using a protractor – the distance between the tick marks will vary depending on the size of your circle, but when you measure the angles in the center, your lines will be 15 degrees apart. In terms I better relate to: think of a pie and then cut it into 24 pieces. Cool? Cool.
Figure out how large you want your starburst to be. I made the long arms of mine 18.5” and the short arms 12.”5” from the center of my template (the spokes). I sketched it out on a large sheet of paper first to see if I liked the size. I picked a size for the starburst that would be slightly larger than my chandelier.
This graphic shows you how the starburst is created from your little round “pie” template:

Then, turn off the breaker.
^ See how I put that in all caps? It’s a very important step. It’s easiest to paint before the light fixture is installed (in fact, in this case, it would be just about impossible to paint with the chandelier up there) so you’re going to be working around an exposed light fixture junction box and you do not want live electricity up there.
So kill that electricity. Kill it dead.
Next, you’re going to use that little cardboard template, a pencil, and a straight edge to draw the spokes of the starburst onto the ceiling. 12 long spokes & 12 short spokes alternating around the circle. Then, use the straight edge to draw the sides of the starburst’s arms from the tick on each side of your spoke to the end of the spoke. (See detailed graphic above.)
Finally, tape away. I figured out that if I was careful with how I taped the long arms of the starburst, I could paint them all at once, and then go back and do the short arms afterwards.
Super secret tip: For perfect clean lines, use some of your ceiling paint to go over the edges of the tape before painting your actual starburst color. This prevents ANY AND ALL bleeding. Magic, I tell you!

Now, I did have some issues in between “round 1” and “round 2” when the tape I used for those beautiful, clean lines ripped up a good portion of my ceiling paint with it… Yikes!
This room was the first room where I scraped the popcorn ceilings, mudded, sanded, primed & painted, and I’m guessing that in between my sanding and priming step, I didn’t do a good enough job of cleaning the sanding dust off the ceiling, which caused my ceiling paint not to adhere very well. You probably won’t have the same problem, but perhaps use a delicate surfaces tape just to be safe.
This led to hours of careful touch up work with a tiny angled paintbrush and painting in the second round of sunburst arms by hand! And days of extreme neck pain. Just call me Michaelangelo…
However, the end result is totally worth it!

The metallic paint glows beautifully!


The second element of the new dining room additions is this fun free-form geometric mirror I created using the Honefoss mirrors from Ikea.

You Will Need:
Honefoss mirrors ($14.99/10 pack) – I used 3 packs.
An hour or two of free time

First, I laid out my Honefoss mirror tiles on the dining room table to come up with a design I liked. This took me way too long, as I was very particular about interspersing the smoke and gold colored tiles in a “effortlessly” “random” fashion. Spoiler alert: the placement was neither effortless nor random.
And if you’re especially observant, you’ll have noticed that the pattern laid out on the tabletop is not the pattern that actually ended up on the wall. The culprit being my measurements.
If I had started the bottom tiles an inch closer to the mantel, there would have been room for the topmost tiles beneath the white header trim.
But I didn’t, and there wasn’t, so I had to reconfigure my design slightly on the fly. I survived.
The tiles installed very easily with double sided foam squares:

The Ikea instructions show that they aren’t supposed to be butted up edge to edge, so I just eyeballed a few-centimeters between them. Once the foam hits the wall, it sticks and sticks tight, so you want to be very careful with your placement.
However, there was one tile that I decided to move after the fact – it was pretty hard to peel up, but it didn’t take any paint with it (yay!) and only left a little adhesive residue behind that was easy to scrape off with my finger nail.
So, this is isn’t glued-to-the-wall-with-liquid-nails permanent, but I don’t think I’d recommend it for a temporary placement either. Just FYI.

I love these tiles so much. Ever since I spotted them in the Ikea catalog when they first introduced them in 2012, I’ve brainstormed ways to incorporate them into my life.
This is just perfect. They belong with this chandelier.


Well, that just about wraps up today’s photo-intensive Layer 2 post! Check out Layer 1 here if you missed it!
UPDATE: Layer 3 is here!
What do you think of the newest dining room updates?

Love it! It's quite challenging to paint a good symmetrical starburst and your turned out so good. Can't wait to see the chairs too.
I've always wanted to use those Ikea mirrors somewhere. They look great over the fireplace for sure.
Oh and I just clicked on your bloglovin button right above and noticed that it's not working just FYI
Thank you! I can't wait for the weekend so I can work on the chairs some more!!! I have the fabric sitting out in the dining room to motivate me 🙂
Thanks so much for letting me know about the bloglovin button! It should be all fixed now!
Wow, LOVE THIS!
Thank you Ruth 🙂
Love this!! Can't wait to see what you're planning to do next 🙂
Thanks Emily! I'm pretty excited about "layer 3"!!!
those tiles are a showstopper– I need to find a place for them in my house! It's really shaping up to be an awesome room 🙂
They are so fun! I want an entire wall of them next 😉
Simply Gorgeous!!
I'm infatuated with how everything's evolving in your dining room. The metallic-feel of the medallion in the evening, the honey bee mirrors (which I had no idea Ikea carried btw!). Gosh girl you are a show stopper every time!!
I'd say the medallion was worth the neck and back pain!
Trisha, your comments are always so sweet and encouraging! You're the best! I'm so glad you like the updates & yes – those Ikea mirrors are the bomb!
ok i am totally copying this for my dining room!!!!!!! i have been wanting to put up a medallion but this is more in my budget and aesthetics!!!! LOVE!
Aw, yay! That would be awesome Cassie!
I tell you what, not only is this absolutely beautiful and original work, the post was great. I really appreciate hearing all the details. Good job! Keep us informed. I'm so excited to see what's next!
Thank you Linda! I'm so glad you enjoyed the post and that it wasn't *too* detailed 😉 I get a little wordy sometimes!
Looks great! Very creative and coming together nicely : ]
Thanks Jennifer! 🙂
Love how this is all turning out!
Yay! Thank you Dena! 😀
LOVE the ceiling medallion! Great job!
http://www.designsbykaty.com
Thank you Katy!
It looks awesome Brynne!!!! I am loving that room so much! The medallion is soooo amazing- were your arms and neck killing you? And I need some of those tiles on my life ASAP!!
SO BAD! I had to take a few days break in between coats, lol! Thanks so much Tania 🙂
I am so jealous of the sunburst medallion!!!! You are so creative!
Thank you Tracy! Your comment put a big smile on my face 🙂
I love the details and look forward to the future layers.
Thank you Jessica! There are good things to come 😉
Completely in love! That's all I can say. Whoa.
Thank you love! 🙂
Boo on my textured walls (and ceilings) because this my friend, is stunning! Great work as always.
Aw, thanks Amy! 🙂 These ceilings used to sport a hefty coat of popcorn, but that was last summer's DIY project!
I totally agree with ^^Amy. I'm totally jealous that I have to rock popcorn ceilings when you have that! Looks fab and I totally adore those mirrors.
Oh girl, the popcorn ceilings that were in this room! So bad! I spent months removing the popcorn and then repairing the ceilings to be [mostly] smooth! It feels so good to see it pay off this way 🙂
I'm in love with those mirrors, the sunburst, and maybe perhaps you and your "effortlessly random" quirks.
Aw! Love you too Megan! 🙂
Fabulous – you are a DIY GENIUS!!
Can I frame this and get it notarized? 😉 Thanks Kimberly!
Brynne! You are so creative! It is looking amazing. I really like watching the room come together. That sunburst design on the ceiling is gorgeous! As is the cool mirror that looks like homeycomb!
Can't wait to see more!
Jenni
Thank you Jenni! I'm so glad you're enjoying the dining room makeover series 🙂
It's coming together beautifully, Brynne! I love that medallion on the ceiling!
Thank you Alexis! I love that medallion so much! It makes me happy every time I walk in the room 🙂
This looks amazing! Love all the little details that come together.
Thank you Jessica! 🙂
I'm in love with this Brynne. Absolutely awesome idea and I'm raving over that honeycomb mirror as well. You're so creative love. Brilliant.
Thank you Zakkiya! You're so sweet!
The medallion looks GREAT!
Thank you Meghan! I'm so glad you like it!
Wow, great job on that ceiling medallion! I love it. Great job on the room so far all your colors and finishes compliment each other so well.
Thank you Brenda! Your comment is so sweet!
I love this!!! The medallion looks so pretty.
Aw, thank you Carmody! 🙂
I really love those mirrors and the ceiling detail is awesome! Thanks for sharing at The Makers!
Corey @ TinySidekick.com
Thank you Corey! I can't wait to share "Layer 3" at the Makers this week! 🙂
Just wanted you to know that I love this so much, you're being featured on The DIY'ers today! http://homecomingmn.blogspot.com/2014/04/the-diyers-58.html
Thank you Kayla! So exciting!!! 🙂
I'm floored by this. The medallion is absolutely gorgeous and perfect!!!
Thank you Amy! *huge smiles* Your comment is so sweet!
I love the updates! I'm featuring you tonight at the Do Tell Tuesday party!
How fun! Thank you 🙂 I'm so excited to come over for the party!
Stunning! Your sunburst and mirrors are just phenomenal! So unique and cool! I absolutely love all of your projects and want you to come redo my whole house 🙂
Thank you Angela! Your comment made my day 🙂 The next step in the dining room makeover is now live too! Dining Room Updates: Black & Leopard Chinese Chippendale Chairs
wow so amazing!!! i need to find somewhere in my house to knock off your mirrors!! Thanks so much for sharing and featuring you tomorrow on the blog- thanks for linking up at creativity unleashed and hope to see you back!
This looks so great. So in love with the sunburst around your light!
Are your walls HardiePanel?
The fireplace wall is, oddly enough! I'm not really sure why, but that's what's on the wall there 🙂
Oh. My. Gosh.
That ceiling medallion.
It is definitely going to happen in my house. I LOVE IT!
Thank you so much for sharing! Your dining room is gorgeous!
I just wanted to let you know that I followed your tutorial and did this on my dining room ceiling and it is the best thing ever. Our ceilings have a slight texture to them, so I did have to go back and touch up the edges of the sunburst, but it was worth every second. My husband says this is his favorite of the many, many projects I’ve done in our house. So thank you for this post – it made our house!
Oh yay! I’m so glad to hear that! It’s definitely one of my favorite projects too!
P.S. If you’d like to share pictures, I’d love to see them (and share with fans of The Gathered Home Facebook page, if you’d like)! You can send them to thegatheredhome@gmail.com 🙂